Botman in Laravel
Posted By : Piyush Mishra | 30-Jun-2022
What is Chatbot??
At the basic level, a chatbot is a computer program that simulates and processes human conversation allowing humans to interact with the digital services as if they were communicating with a real person. Chatbots can be simple as rudimentary programs that answer a simple query with single-liner commands or as sophisticated as digital assistants that learn and evolve to deliver increasing levels of the scenario the basic personalization we can do on it, they gather and process information.
You probably interacted with a chatbot whether you know it or not. For example, a window pops up on your screen asking if you will check-in and perhaps it commands on your way to a concert and you use your smartphone to request a ride via chat or you might have used voice commands to order a coffee and receive a response telling when your order will be ready and what it will cost. These are examples of scenarios in which you could understand the chatbot functionalities.
Now are the Steps to install Botman
To get the function of the chatbot
next, we need to install botman into the laravel setup
Open the terminal of the project and run these commands
COMMAND 1:- composer require botman/botman
COMMAND 2 :- composer require botman/driver-web
Create config file
This config file is for driver and cache.
let's create a folder with the name botman inside /config directory
Create two files inside/ config/botman
config.php
web.php
open /config/botman/config.php
open /config/botman/web.php
Create Controller
open project into the terminal and run this artisan command
$ php artisan make:controller BotmanController
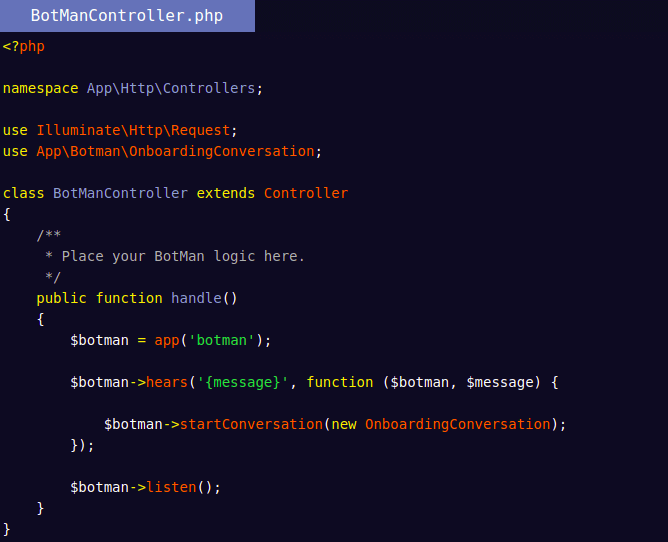
It will create the BotManContoller.php file in /app/Http/Controllers folder.
Open BotmanController.php
Add Route Now
Open web.php from /routes folder and add this route
Create Blade File
open any of the view files from your application I am opening the default view file welcome.blade.php
add this simple code to it...
Application Testing
Open the project to the terminal and type the commands to start the development server
$ PHP artisan serve


Cookies are important to the proper functioning of a site. To improve your experience, we use cookies to remember log-in details and provide secure log-in, collect statistics to optimize site functionality, and deliver content tailored to your interests. Click Agree and Proceed to accept cookies and go directly to the site or click on View Cookie Settings to see detailed descriptions of the types of cookies and choose whether to accept certain cookies while on the site.


About Author
Piyush Mishra
Piyush Mishra is a skilled Backend Developer with over 3+ years of experience in the industry. He has an in-depth understanding of the latest technologies and practical experience in working with various tools and frameworks such as PHP, Laravel Framework, Wordpress CMS, Nodejs, Apache, Javascript, Jquery, and databases. He possesses a creative mindset and strong analytical skills that allow him to think critically and explore new technologies with ease.He has worked on several noteworthy projects, including NCG Television, INW (I Need a Word), and StreamlyTV. For NCG Television, he created the backend of an OTT platform with a subscription-based model using Wordpress. For INW, he developed an OTT platform with live streaming, podcast features, and stories functionality using Wordpress, Vimeo, and Nodejs on the backend. For StreamlyTV, he developed a channel live streaming platform using Laravel, Wowza Streaming Engine, AWS, and Stripe payment gateway on the backend.