Docker Containerization Using Docker Compose
Posted By : Piyush Kumar Shrivastwa | 10-Sep-2020
Docker-compose is basically used for multi-container docker application. We can manage these containers with single commands.
Docker Compose Installation Procedure on Ubuntu
1. Execute the command for the current stable release of Docker Compose.
$ sudo curl -L "https://github.com/docker/compose/releases/download/1.26.0/docker-compose-$(uname -s)-$(uname -m)" -o /usr/local/bin/docker-compose
2. Assign executable permissions to the binary:
$ sudo chmod 666/777 /usr/local/bin/docker-compose
3. Test Docker compose installation.
$ docker-compose --version
![]()
Let's create a spring boot application with REST service has a POST method in the controller.
@RestController
@RequestMapping(value = "/api/v1/")
public class UserController {
  private UserService userService;
  ResponseEntity responseEntity;
  @Autowired
  public UserController(UserService userService) {
    this.userService = userService;
  }
  /**
  * PostMapping Annotation for mapping HTTP POST requests onto
  * specific handler methods.
  */
  @PostMapping("user")
  public ResponseEntity<?> saveUser(@RequestBody User user) throws UserAlreadyExistsException, Exception {
    User savedUser = userService.saveUser(user);
    responseEntity = new ResponseEntity(savedUser, HttpStatus.CREATED);
    return responseEntity;
  }
}
The code has one method to save user details. It calls the saveUser() method of UserService.
Configure docker-compose File
Docker Compose uses a YAML file docker-compose.yml for configuring your application's service. Create a docker-compose.yml to manage MongoDB and user-service containers at the root of the project.
version: '3'
services:
  mongo:
    image: mongo:3.6.18-xenial
    container_name: mongo
    restart: always
    ports:
      - 27017:27017
    network_mode: host
    volumes:
      - $HOME/mongo:/data/db
    healthcheck:
      test: "exit 0"
  user-service:
    build: user-service/
    image: user-service
    depends_on:
      - mongo
    network_mode: "host"
    hostname: localhost
    restart: always
    ports:
      - 8082:8082
    healthcheck:
      test: "exit 0"
1. Line number 1 sets the version of the docker-compose. like the version is 3.
2. We need a mongo image to run mongo in Docker container, Line no 4 uses to create mongo image mongo:3.6.18-xenial.
3. Specifies a custom container in line no 5.
4. restart:always in Line number 06 configuring for how to restart containers when they exit.
5. Line number 9 maps the host port of the container's port. Mongo basically listens on port 27017 that is different from the network of your system,also known as host network. On the other side, the mongo client will try to connect with the port specified 27017 of the host network.
6. Container shares the host networking namespace by specifying the host network in the mode at line no 9.
7. Map a directory of our local filesystem in docker where mongo writes data.HOME/mongo will mount as /data/db inside the running container.
8. Line no 12 and 13 determine whether or not the containers for this service are health.
9. Line no 16 instruct docker com[ose to build spring boot image.
10. Line no 18 and 19 specifies the user-service container depends on mongo container. So Docker-compose will start the user-service container.
Passing Environment Variable
At times, you will need to pass environment variables to containers.
One use case for Mongo is to create additional users, initialize collections, and indexes at build time.
The trick is to use the MONGO_INITDB_DATABASE variable that allows you to specify the name of a database to be used for creating scripts in /docker-entrypoint-initdb.d/*.js .
means, if you supply the image with init scripts, it will run them against the $MONGO_INITDB_DATABASE database.
version: '3'
services:
    mongodb:
        image: mongo:latest
        container_name: mongodb
        restart: always
        environment:
            MONGO_INITDB_ROOT_USERNAME: <admin-user>
            MONGO_INITDB_ROOT_PASSWORD: <admin-password>
            MONGO_INITDB_DATABASE: <database to create>
        ports:
            - 27017:27017
        volumes:
            - ./mongo-init.js:/docker-entrypoint-initdb.d/mongo-init.js:ro>
The code of mongo-init.js is this.
db.createUser(
        {
            user: "<user for database which shall be created>",
            pwd: "<password of user>",
            roles: [
                {
                    role: "readWrite",
                    db: "<database to create>"
                }
            ]
        }
);
Managing Containers
1.Start Container
This command is basically used to start the service.
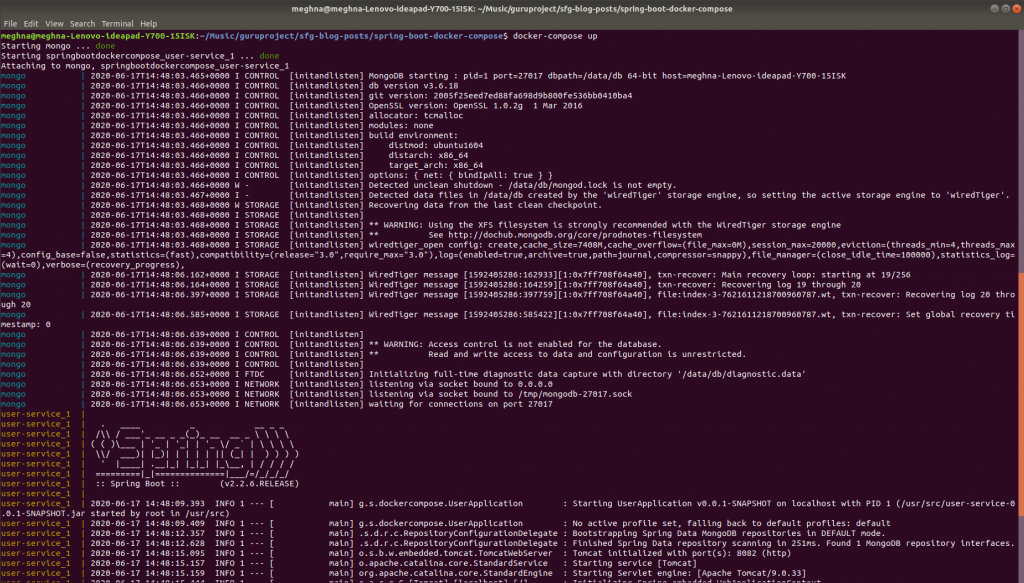
$ docker-compose up
The figure shows the output.
This command is used to check running containers
$ docker-compose ps

Commonly used commands:
1. "docker-compose up": It builds, (re)creates, starts, and attaches to containers for a service. Unless they are already running, this command also starts any linked services.
2. "docker-compose start": It starts the existing containers for a service, Use start if you need to restart containers that were previously created, but were stopped. It never creates new containers.
3. "docker-compose stop": It stops running containers, but it won’t remove them.
4. "docker-compose down": It stops containers and also removes the stopped containers as well as any networks that were created.
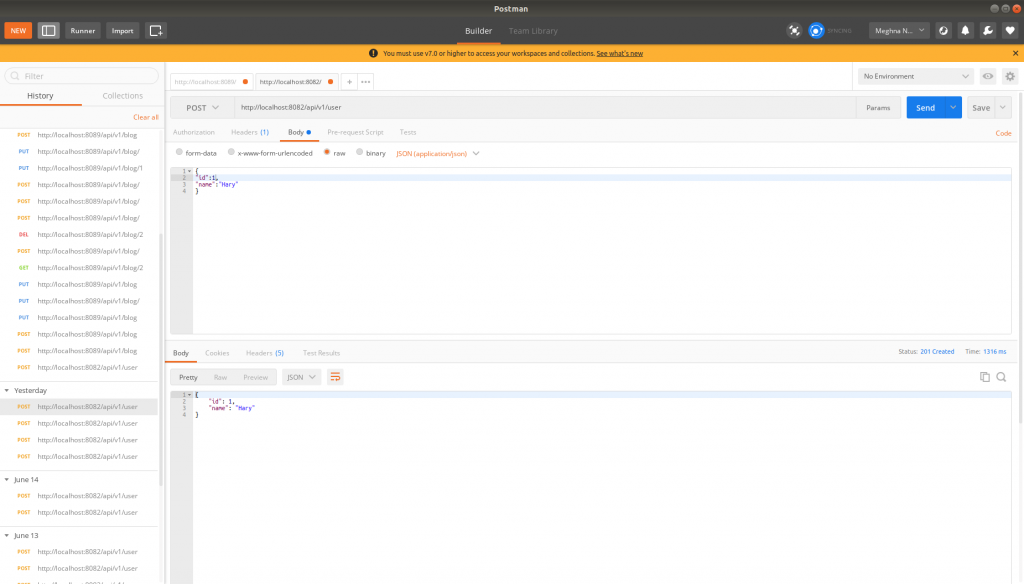
Now that the container is running, we’ll try accessing the RESTful service using Postman.
Docker Compose is widely used for Continuous Deployment or Continuous Integration process. Compose offers a convenient way to create and destroy isolated testing environments for test suites in just a few commands, by defining the full environment in a Compose file (YMAL).
Overall, it’s a cool tool to run multiple isolated services on a single host.
We, at Oodles Technologies, nurture experienced developers who are skilled at using container tools like Docket, Kubernetes, Apache Kafka, and Spring Boot to build and deploy microservice-based applications. Explore our DevOps services and learn about our offerings in microservice-based application development. For project-related queries, contact us at [email protected].


Cookies are important to the proper functioning of a site. To improve your experience, we use cookies to remember log-in details and provide secure log-in, collect statistics to optimize site functionality, and deliver content tailored to your interests. Click Agree and Proceed to accept cookies and go directly to the site or click on View Cookie Settings to see detailed descriptions of the types of cookies and choose whether to accept certain cookies while on the site.


About Author
Piyush Kumar Shrivastwa
He is hardworking and honest about his work and is familiar with Spring framework, etc. He has keen interest in learning more about new technologies.