Using TextViewWidget in Netgem sdk
Posted By : Deepak Kumar | 26-May-2014
This blog will descibe how to use TextViewWidget in netgem sdk.
A TextViewWidget is used to display text. It is a scrollable text area with two modes of scrolling :
(1)By page. Text is displayed block by block.
(2)By line. Text is displayed one line at a time.
In this blog i will show both the above modes .
First you need to create two "TextViewWidget" in JSON file. Here is the code for this.
	  "widgets": {
	        "repeatBlockTextView" : {
	            "create": "TextViewWidget",
	            "param": {
	                "w": 500,
	                "h": 200,
	                "zIndex": 100,
	                "speed": 300,
	                "bounds": { "x": 400, "y": 330 },
	                "nextKey":"KEY_NEXT",
	                "prevKey":"KEY_PREV",
	                "doNotRepeatLines": false,
	                "hideGradientMask" : true,
	                "scrollByPage": true,
	                "nextKey_picto": "<!picto!>Y<!>",
	                "prevKey_picto": "<!picto!>Z<!>",
	                "pageCount": {
	                    "bounds": {
	                        "x": 120,
	                        "y": 210,
	                        "w": 200,
	                        "h": 30
	                    }
	                },
	                "hideScrollbar": true
	            }
	        }
As above mentioned you will have to set "scrollByPage" attribute to true, if you want to show text over different pages. If you don't want to show the partial text of next page in current page , set "hideGradientMask" to true.
I have used two TextViewWidgets , so here is configuration for other textViewWidget.
	  "lineTextView" : {
	            "create": "TextViewWidget",
	            "param": {
	                "w": 500,
	                "h": 200,
	                "zIndex": 100,
	                "speed": 300,
	                "bounds": { "x": 400, "y": 330 },
	                "scrollbar": {
	                    "w": 20,
	                    "h": 200,
	                    "sideSize": 20,
	                    "itemSize": 8,
	                    "align": "center",
	                    "zIndex": 10,
	                    "speed": 300,
	                    "bounds": { "x": 510, "y": 0 }
	                },
	                "nextKey":"KEY_DOWN",
	                "prevKey":"KEY_UP",
	                "doNotRepeatLines": true,
	                "hideGradientMask" : true,
	                "scrollByPage": false,
	                "hideScrollbar": false
	            }
	        }
Set configuration for painterwidget to show helping menu.
	   "buttonList": {
	            "create": "PainterWidget",
	            "param": {
	                "w"         : 700,
	                "h"         : 30,
	                "zIndex"    : 1,
	                "speed"     : 300,
	                "options"   : ["tmpBuffer"],
	                "bounds"    : {"x": 380, "y": 660},
	                "elements": [
	                    { "type": "text", "id":"text", "bounds": {"x": 0,"y":  0,"w":700,"h":30}, "custo" : "text" }
	                ]
	            }
	        }
Now set text to be displayed .
	function MyFormWidget(_json, _options) {
	 this._text = "Lorem ipsum dolor sit amet, cum amet amet enim hendrerit aliquam bibendum. Wisi vel enim, magnis turpis maecenas eget mi. Sed sollicitudin at accumsan, neque dolor, laoreet mauris lorem, nunc wisi nunc ad, phasellus id porttitor quis orci nostra molestie. Urna fermentum consequat sed nec egestas. Aliquam donec erat etiam ipsum amet, amet et enim, mauris cursus ac egestas sem non, euismod integer metus ante donec. Imperdiet ut dolor ultricies, irure nulla gravida pellentesque hymenaeos nonummy, adipiscing dis, eu dictum amet, dolor nulla ut at phasellus. Odio suscipit et arcu quis conubia, lectus volutpat iste praesent ut inceptos dui, mauris consectetuer bibendum amet interdum amet aliquet. Lectus sed tempore enim pellentesque, elit turpis nunc non ac, mattis pellentesque sed curabitur pellentesque molestie interdum, taciti a ac risus integer malesuada, adipisci ut.";
	}     MyFormWidget.prototype.onEnter = function onEnter(_data) {
	     repeatBlockTextView.setData(this._text);
	 lineTextView.setData(this._text);       //Setting current text view
	 this.currentTextView = repeatBlockTextView;        //Displaying current text view
	  repeatBlockTextView.stateChange("enter");
	   this.updateButtonBar(); //This method  is used to update "buttonList" painterwidget. }
Now if you want to view text in "line by line" mode press 2 or if you want to view text in "page by page" mode press 1. Here is code for this.
	MyFormWidget.prototype.onKeyPress = function onKeyPress(_key) {
	   switch(_key) {
	        case "KEY_TV_1":
	            this.switchTextView(this.widgets.repeatBlockTextView);
	            return true;
	        case "KEY_TV_2":
	            this.switchTextView(this.widgets.lineTextView);
	            return true;
	        default:
	            break;
	    }

	    if(this.currentTextView) {
	        var keyHandled = this.currentTextView.keyHandler(_key);
	        if(keyHandled) {
	            return true;
	        }
	    }

	    return false;
	}
To change the mode , i have implemented this method. This method reacts on key pressed by user and changes the view.
	MyFormWidget.prototype.switchTextView = function switchTextView(newTextView) {
	    var currentTextView = this.currentTextView;

	    if(currentTextView !== newTextView) {
	        currentTextView.stateChange("exit");
	        currentTextView = this.currentTextView = newTextView;
	        currentTextView.stateChange("enter");
	    }
	    //Updating button bar
	    this.updateButtonBar();
	}
To update the helping menu "updateButtonBar" is being called . Follwoing is code for that.
	MyFormWidget.prototype.updateButtonBar = function updateButtonBar() {
	    var prevPicto = this.currentTextView.prevKey_picto || "<!picto!>y<!>",
	        nextPicto = this.currentTextView.nextKey_picto || "<!picto!>z<!>",
	        text = "1..2 Switch Text View - " + prevPicto + " Scroll Prev - " + nextPicto + " Scroll Next";

	    var data = {
	        "text" : text
	    };
	    this.widgets.buttonList.setDataAnimated(data);
	}
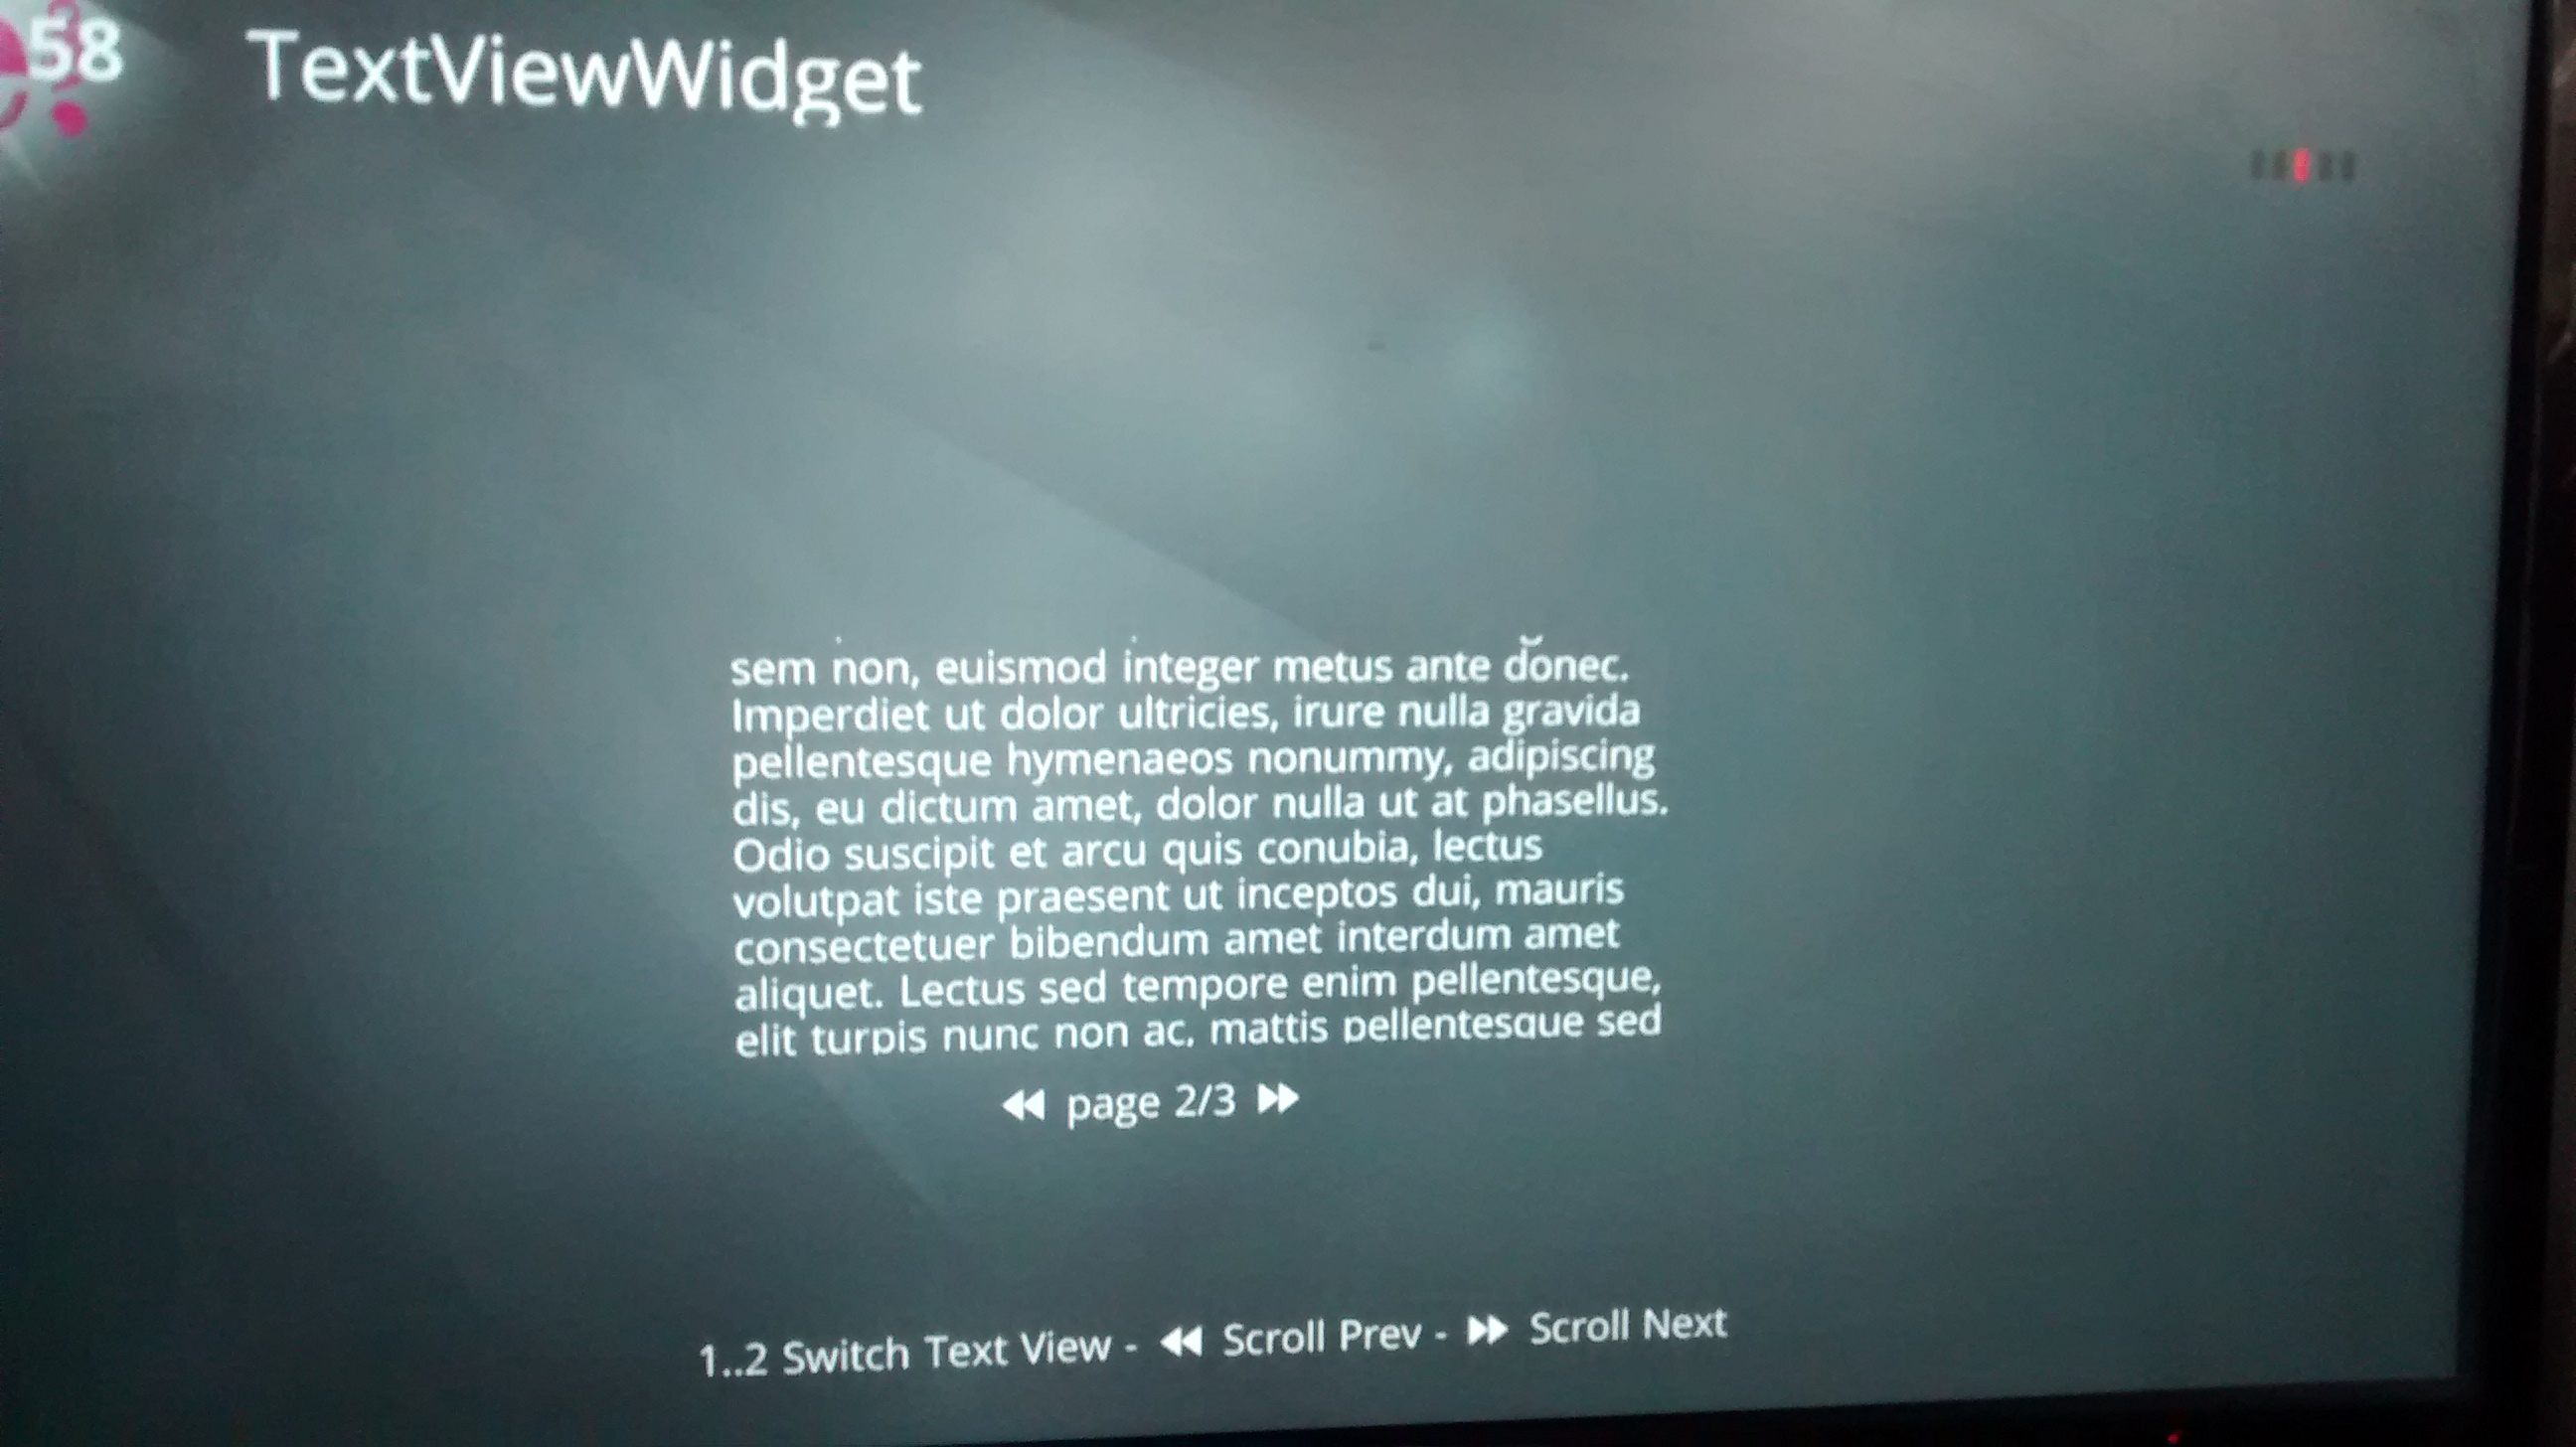
Using page by page text view, you will the following output.
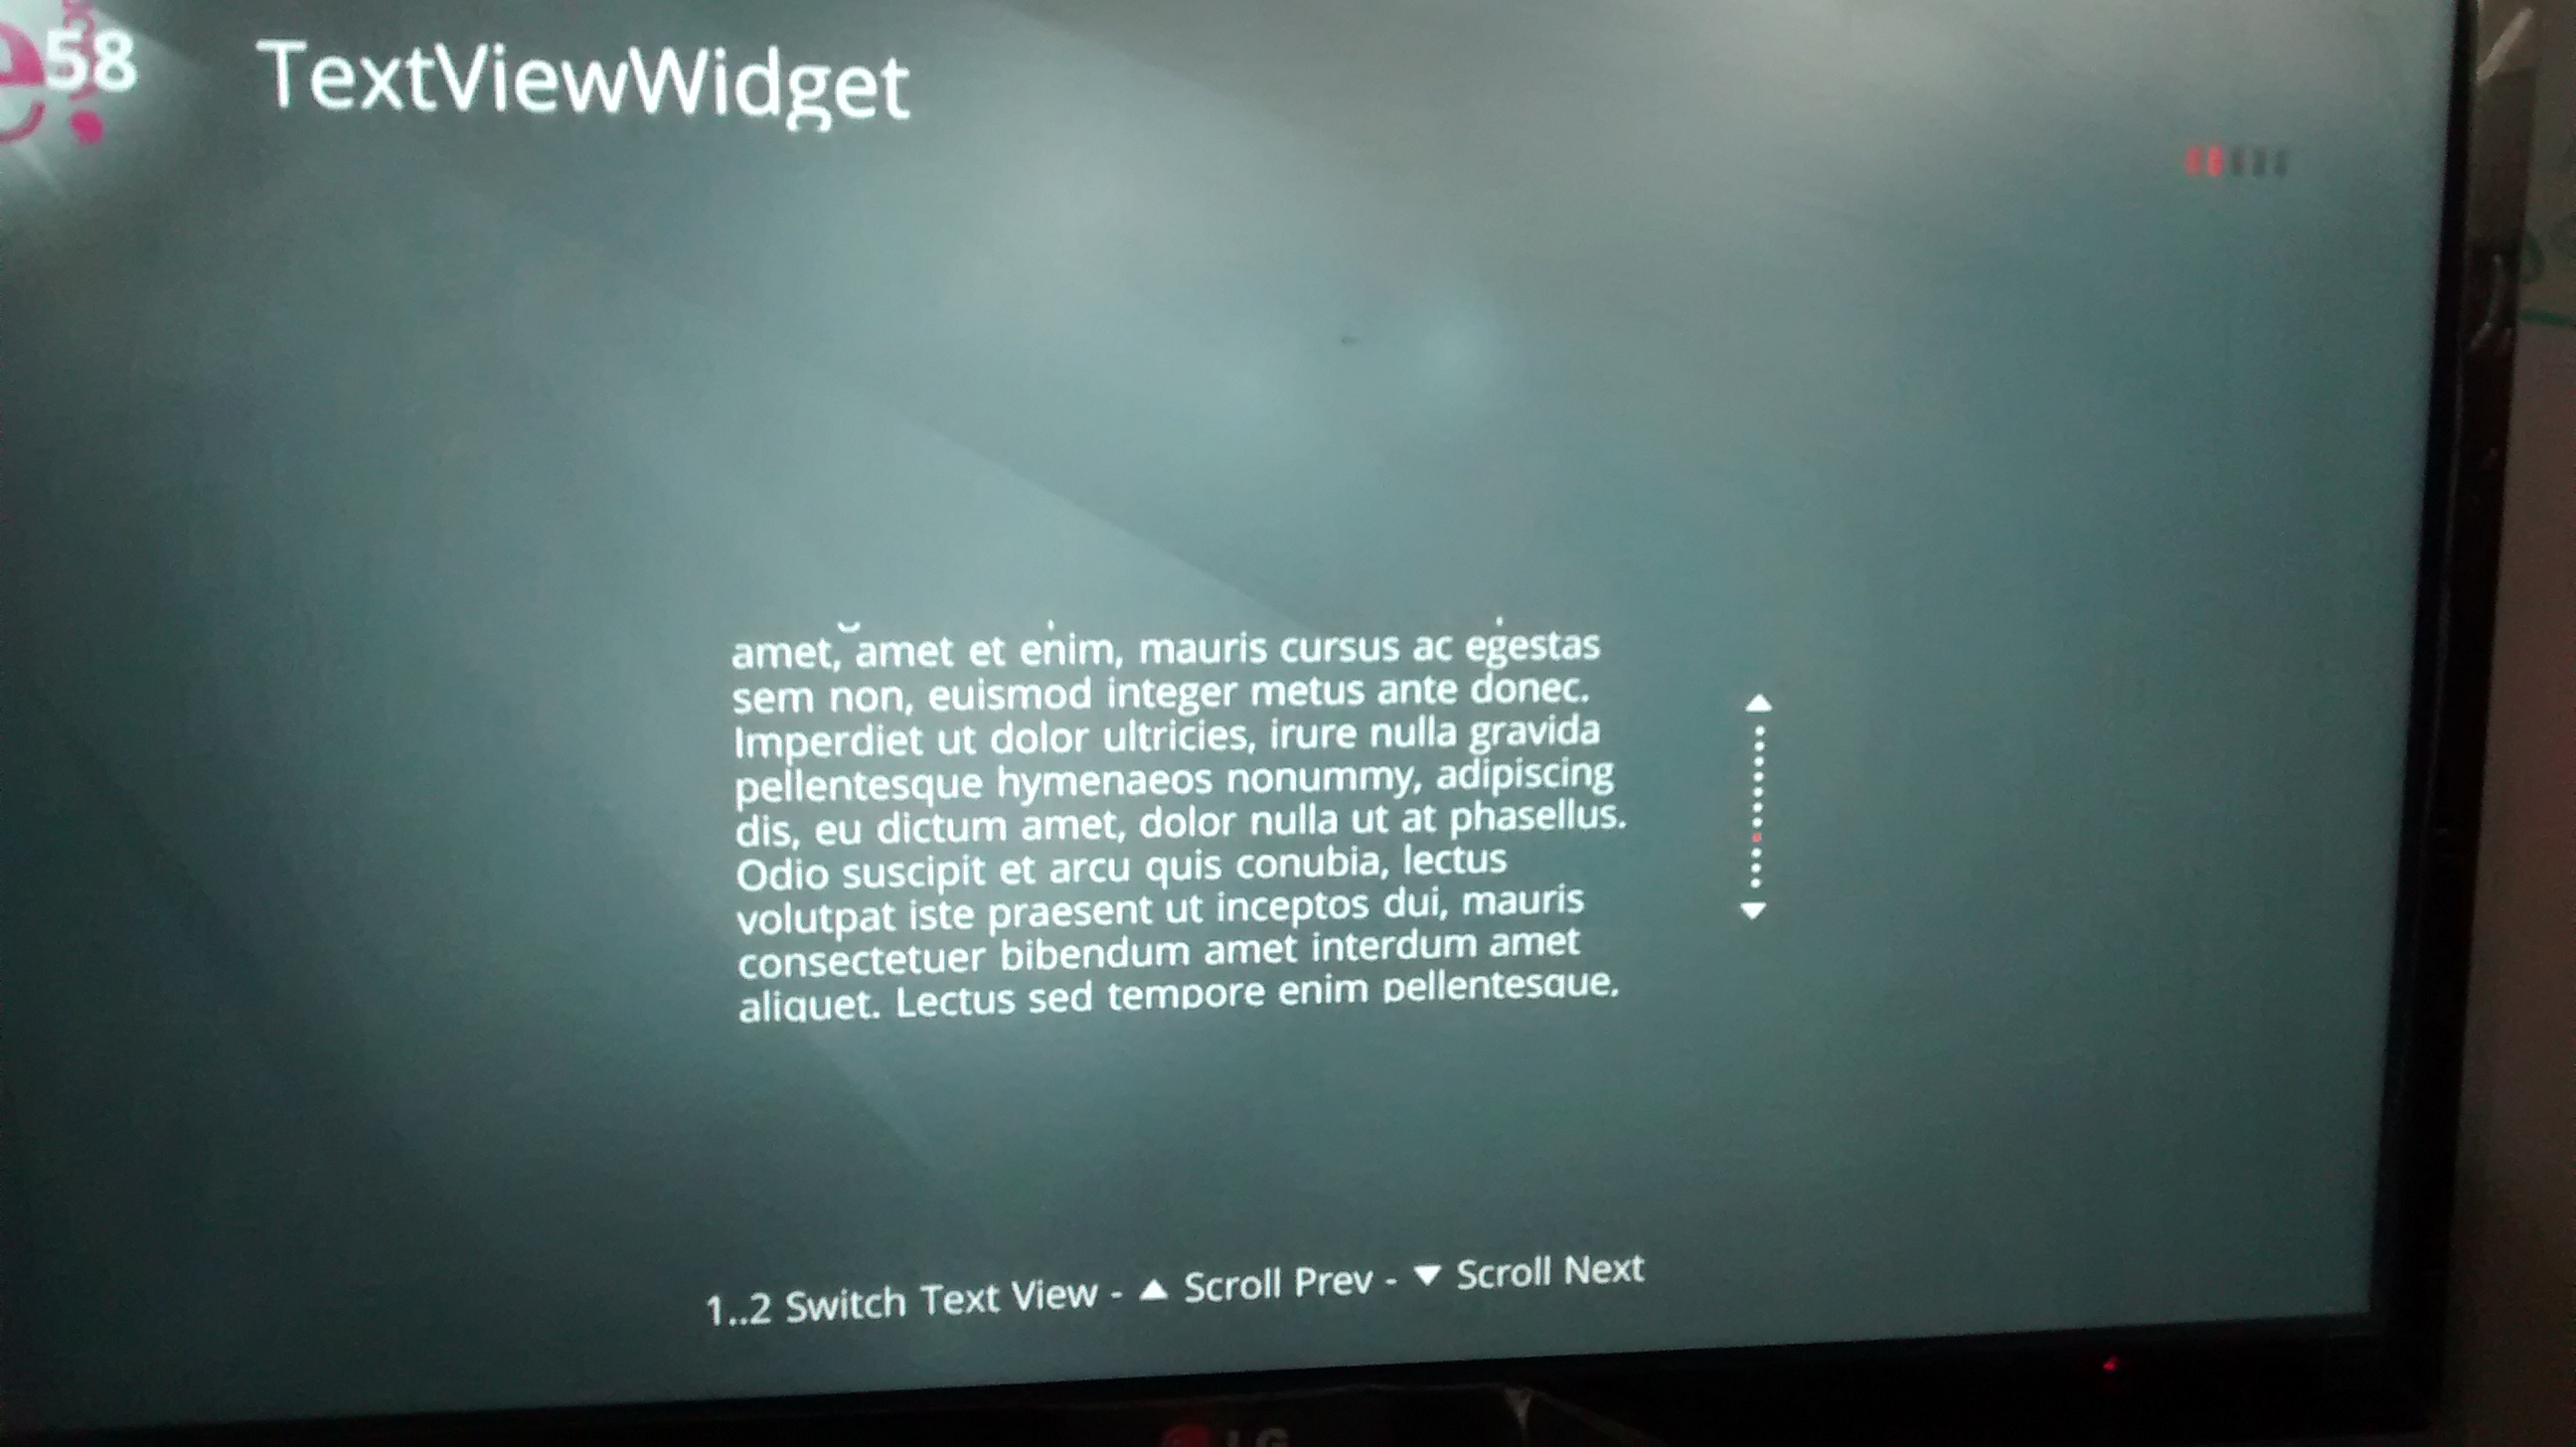
If you change the mode to "line by line" your output will look like this.


Request for Proposal
Cookies are important to the proper functioning of a site. To improve your experience, we use cookies to remember log-in details and provide secure log-in, collect statistics to optimize site functionality, and deliver content tailored to your interests. Click Agree and Proceed to accept cookies and go directly to the site or click on View Cookie Settings to see detailed descriptions of the types of cookies and choose whether to accept certain cookies while on the site.


About Author
Deepak Kumar
Deepak is a bright Web App Developer, and has good knowledge of Core Java, Advance Java (Servlet, JSP, JSTL) and Hibernate, JUnit.