JMeter Graph Results Listener
Posted By : Aditi Nahar | 25-Jun-2018
I believe you would have heard about the JMeter listeners and maybe probably used some of them. Today, in this article I am going to discuss JMeter Graph Results listener.
JMeter, as you are aware of, is a performance testing tool and after doing testing, monitoring and analysis of different test results and parameters is the most important part. Thus, here come the listeners in the picture, they provide UI to view the sent request and response received from the server. These results can also be saved in files for later use or can be viewed live while the tests are running.
What is Graph Results listener?
Graph Results listener allow us to view the test results in the form of a graph. It generates a simple graph in which all sample time is plotted against the response time. This helps us in analyzing the result in less time and with more understanding.
Now first let’s see how we can add this listener to our Test Plan:
Step 1: Create a Test Plan
Right Click Test Plan > Threads (Users)
Set values of No. of Threads (users) as 1000, Ramp Up Period (in seconds) as 1 and Loop Count as 1.
Step 2: Add HTTP Request sampler
Right Click on Thread Group > Add > Sampler > HTTP request
Give a Name to the sampler > Set Server Name, Port, HTTP Request Method, and Path (if required).
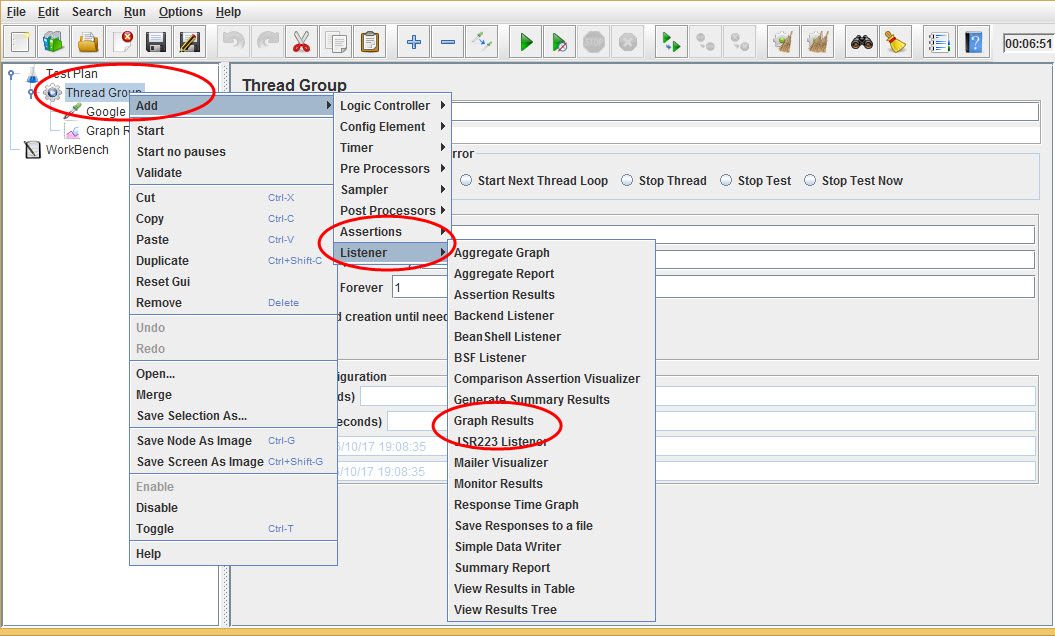
Step 3: All Graph Results Listener
Right Click on Thread Group > Add > Listener > Graph Results.
Step 4: Save this Test Plan and Run the test.
Now check the result on Graph Results listener. The result will be somewhat similar to as shown below:
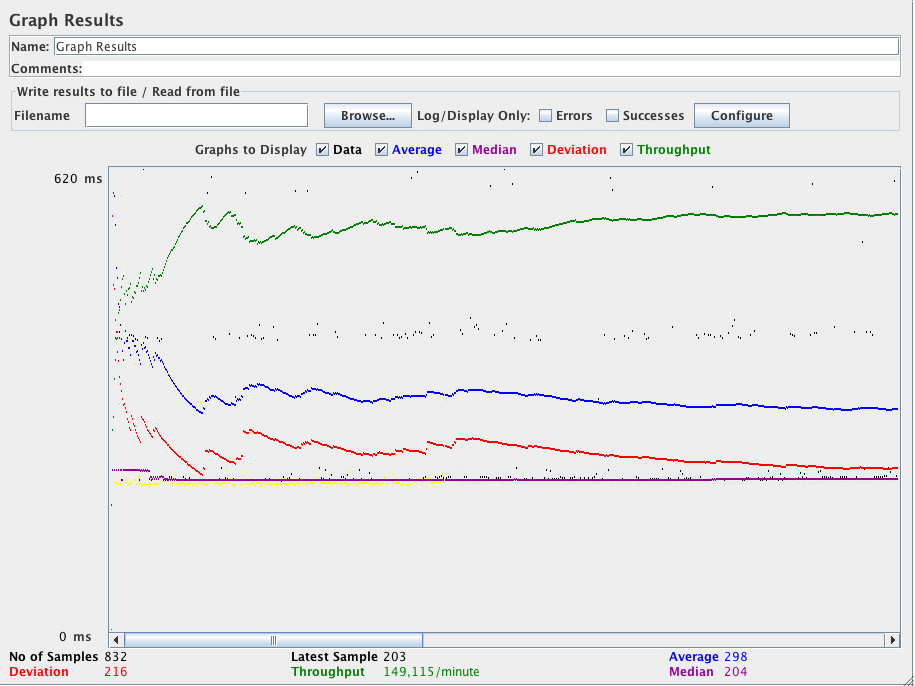
Here, the data in the bottom of the graph displays the current values in milliseconds. Black shows the current sample, Blue shows the current Average of all the samples, Red shows current Standard deviation i.e. deviation of the response time. It should be as low as possible. And Green shows current Throughput rate.
The Throughput rate is the total number of requests handled by server per minute. This time includes total JMeter’s processing time and also if any delay is added to the test. So, we can say that the test produces some real data.
The value on the top left of the graph is maximum of 90
the percentile of response time i.e. it shows the elapsed time below wich 90% of samples fall.
We can save the graph result by specifying Filepath in Filename field under “Write results to file/Read from file”.
I hope this blog will prove useful to you.
Happy Testing:)


Cookies are important to the proper functioning of a site. To improve your experience, we use cookies to remember log-in details and provide secure log-in, collect statistics to optimize site functionality, and deliver content tailored to your interests. Click Agree and Proceed to accept cookies and go directly to the site or click on View Cookie Settings to see detailed descriptions of the types of cookies and choose whether to accept certain cookies while on the site.


About Author
Aditi Nahar
Aditi is a certified QA Engineer with a strong command over management tool sets like JIRA and Trello, as well as QA tool sets for API and performance testing. She possesses excellent verbal and written communication skills and has gained valuable experience in management and leadership while collaborating with clients and large teams. Aditi's ability to apply creative thinking and problem-solving skills makes her adept at handling challenging business scenarios. Her proficiency in manual testing has proven instrumental in identifying issues and ensuring the functionality of applications across web, mobile, and TV platforms. She has made significant contributions to both internal and client projects, including Bits2Btc, AUS-BTC, EZBitex, ACL EAP, Scaffold, Iron Systems VRP, Oremus Zoho, and NOWCAST OTT.