File Uploading with Apache JMeter
Posted By : Aditi Nahar | 31-Oct-2018
Uploading and Downloading a file in web application is very common functionality. JMeter tool provides the feature of file upload and download and thus makes possible to perform load testing of this feature. This article is about how file upload is performed with JMeter. I believe users are well aware about the JMeter which is a load testing tool.
Introduction:
HTML form based file upload with JMeter is not always easy. But don’t worry this blog will make it simple for you. JMeter provides a means to check file upload as a part of test plan and thus behaviour of the application under load can be checked by increasing the number of Threads/Users in the test plan.
Creating the Test Plan in JMeter for File Upload:
1. Let’s first start with Launching the JMeter and creating the Test Plan :
Right click on Test Plan -> Add -> Threads -> Thread group

2. Add HTTP Request Sampler for placing the request on server :
Right click on Thread Group -> Add -> Sampler -> HTTP Request

3. Add Listener for analysing the response from the server :
Right click on Thread Group -> Add -> Listener -> Summary Report/View Results in Tree/View Results in Table.

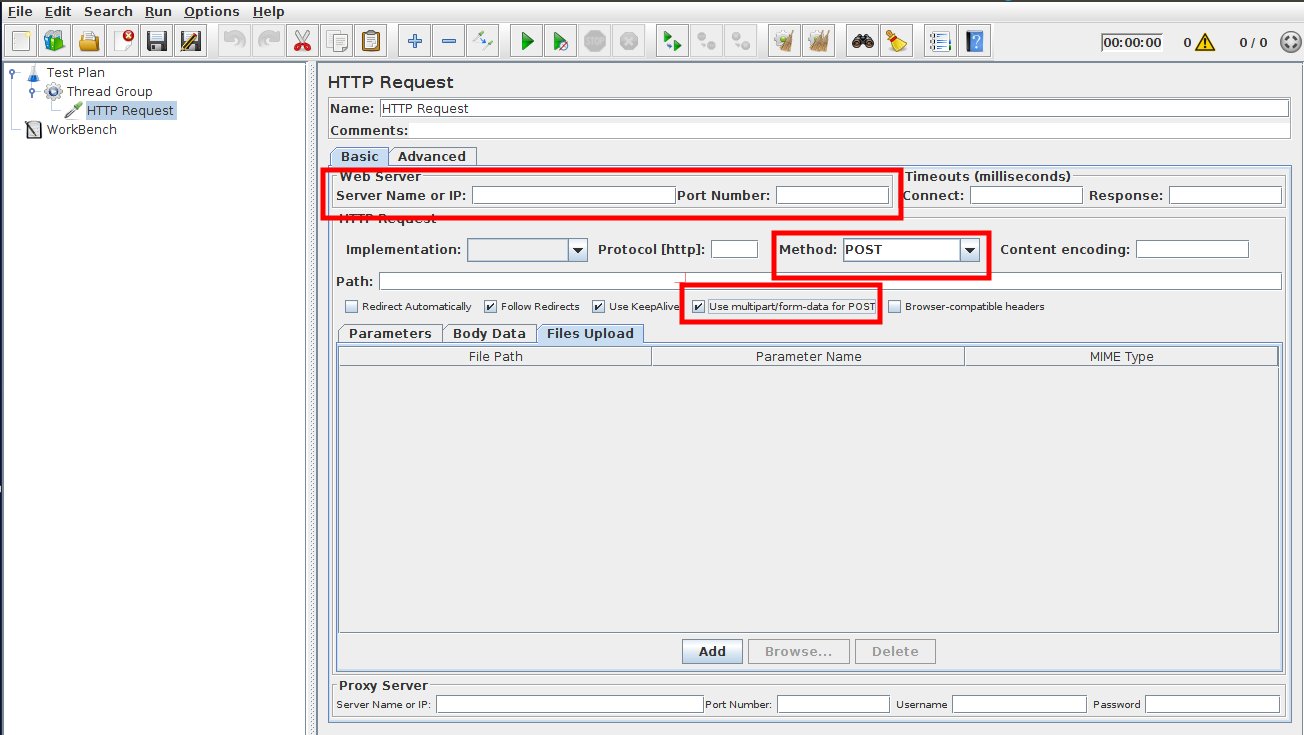
Configuring the HTTP Request Sampler for File Upload :
1. Add Server Name or IP and Port Number and path :/
2. File Upload in JMeter is HTTP POST request therefore select Method as POST.
3. A multipart/form-data request needs to be placed on server therefore check multipart/form-data checkbox.
Look at the HTTP Request Sampler:
Next filling details in the Files Upload section of the HTTP Request Sampler :
Click on Files Upload tab and hit the Add button to fill the following data:
- File Path - Path to the file which is to be uploaded (It is good if full file path is provided here).
- Parameter Name - Unique attribute of file type tag.
- MIME Type - Type of the file to be uploaded. For eg in case of text file, MIME Type will be ‘text/plain’, for image it will be image/plain’ etc.

Here, we are considering the example of https://imgbb.com/
So, Let’s start first with placing the image file on JMeter bin folder.
Now to find the parameter name, right click on ‘Start Uploading’ button -> Inspect and identify the unique identifier. Here it is ‘btn btn-big blue’.

So, the values to be passed in the Files Upload section are :
- File Path - test.jpg
- Parameter Name - btn btn-big blue
- MIME Type - image/jpg

After adding these values in the test plan, Save the test plan.
Now before running the Test plan add the numbers of users in the thread group for which load scenario need to be executed and then Run it.

In the next blog, I will discuss about file download with JMeter.
Happy testing:)


Cookies are important to the proper functioning of a site. To improve your experience, we use cookies to remember log-in details and provide secure log-in, collect statistics to optimize site functionality, and deliver content tailored to your interests. Click Agree and Proceed to accept cookies and go directly to the site or click on View Cookie Settings to see detailed descriptions of the types of cookies and choose whether to accept certain cookies while on the site.


About Author
Aditi Nahar
Aditi is a certified QA Engineer with a strong command over management tool sets like JIRA and Trello, as well as QA tool sets for API and performance testing. She possesses excellent verbal and written communication skills and has gained valuable experience in management and leadership while collaborating with clients and large teams. Aditi's ability to apply creative thinking and problem-solving skills makes her adept at handling challenging business scenarios. Her proficiency in manual testing has proven instrumental in identifying issues and ensuring the functionality of applications across web, mobile, and TV platforms. She has made significant contributions to both internal and client projects, including Bits2Btc, AUS-BTC, EZBitex, ACL EAP, Scaffold, Iron Systems VRP, Oremus Zoho, and NOWCAST OTT.