Install & Configure Apache Hadoop 2.x.x On Ubuntu (Single Node Cluster or Pseudo Distributed Setup)
Posted By : Rohan Jain | 06-Nov-2014
"In this blog I will describe the steps for setting up a single-node Hadoop cluster backed by the Hadoop Distributed File System, running on Ubuntu Linux"
Prerequisites (Configure Enviroment For Hadoop)
1.Setting Up Java
2.Adding a dedicated Hadoop System User
3.Configuring SSH Access
4.Disabling IPv6
1.Setting Up Java
a.Download Latest oracle Java Linux version of the oracle website by using this command
wget http://download.oracle.com/otn-pub/java/jdk/8u25-b17/jdk-8u25-linux-x64.tar.gz
If it fails to download, please check with this given command which helps to avoid passing username and password.
wget --no-check-certificate --no-cookies --header "Cookie: oraclelicense=accept-securebackup-cookie" http://download.oracle.com/otn-pub/java/jdk/8u25-b17/jdk-8u25-linux-x64.tar.gz
b. Unpack the compressed Java binaries, in the directory:
sudo tar xvzf jdk-8u25-linux-x64.tar.gz
c. Create a Java directory using mkdir under /user/local/ and change the directory to /usr/local/Java by using this command
sudo mkdir /usr/local/Java
cd /usr/local/Java
d. Copy the Oracle Java binaries into the /usr/local/Java directory.
sudo cp -r jdk1.8.0_25 /usr/local/java
e. Edit the system PATH file ~/.bashrc and add the following system variables to your system path
sudo vim /etc/profile or sudo gedit ~/.bashrc
f. Scroll down to the end of the file using your arrow keys and add the following lines below to the end of your file:
JAVA_HOME=/usr/local/Java/jdk1.8.0_25
PATH=$PATH:$HOME/bin:$JAVA_HOME/bin
export JAVA_HOME
export PATH
g.Run command
source ~/.bashrc
2.Adding a dedicated Hadoop system user
While thats not required it is recommended because it helps us to separate the Hadoop installation from other applications and user accounts running on the same machine.
Adding group
sudo addgroup Hadoop
Creating a user and adding the user to a group
sudo adduser ingroup Hadoop hduser
3.Configuring SSH Access
The need for SSH Key based authentication is required so that the master node can then login to slave nodes (and the secondary node) to start/stop them and also local machine if you want to use Hadoop with it. For our single-node setup of Hadoop, we therefore need to configure SSH access to localhost for the hduser user we created in the previous section
sudo apt-get install openssh-server
Before this step you have to make sure that SSH is up and running on your machine and configured it to allow SSH public key authentication.
Generating an SSH key for the hduser user.
a. Login as hduser
su hduser
b. Run this Key generation command
ssh-keyegen -t rsa -P ""
c. It will ask to provide the file name in which to save the key, just press has entered so that it will generate the key at ‘/home/hduser/ .ssh’ d. Enable SSH access to your local machine with this newly created key.
cat $HOME/.ssh/id_rsa.pub >> $HOME/.ssh/authorized_keys
e. The final step is to test the SSH setup by connecting to your local machine with the hduser user.
ssh hduser@localhost
This will add localhost permanently to the list of known hosts
4.Disabling IPv6.
We need to disable IPv6 because Ubuntu is using 0.0.0.0 IP for different Hadoop configurations. You will need to run the following commands using a root account:
sudo gedit /etc/sysctl.conf
Add the following lines to the end of the file and reboot the machine, to update the configurations correctly.
#disable ipv6
net.ipv6.conf.all.disable_ipv6 = 1
net.ipv6.conf.default.disable_ipv6 = 1
net.ipv6.conf.lo.disable_ipv6 = 1
You have to reboot your machine in order to make the changes take effect. You can check whether IPv6 is enabled on your machine with the following command
cat /proc/sys/net/ipv6/conf/all/disable_ipv6
So if above steps are completed successfully, you have correctly setup the hadoop environment.
Hadoop Installation
1.Run this following command to download Hadoop version 2.5.1
wget https://archive.apache.org/dist/hadoop/core/hadoop-2.5.0/hadoop-2.5.1.tar.gz
2.Unpack the compressed hadoop file by using this command:
tar xvzf hadoop-2.5.1.tar.gz
3.Move hadoop-2.5.1 to hadoop directory by using give command
mv hadoop-2.5.1 hadoop
4.Move hadoop package to your prefered dir, i use /usr/local in this blog
sudo mv hadoop /usr/local/
5.Make sure to change the owner of all the files to the hduser user and hadoop group by using this command
sudo chown -R hduser:hadoop Hadoop
Hadoop Configuration
Following files are required for hadoop configuration
-> yarn-site.xml,core-site.xml,mapred-site.xml,hdfs-site.xml (located in /usr/local/hadoop/etc/hadoop)
-> .bashrc
Change the user to hduser
Change the directory to /usr/local/hadoop/etc/hadoop
Edit yarn-site.xml
<configuration>
<!-- Site specific YARN configuration properties -->
<property>
<name>yarn.nodemanager.aux-services</name>
<value>mapreduce_shuffle</value>
</property>
<property>
<name>yarn.nodemanager.aux-services.mapreduce.shuffle.class</name>
<value>org.apache.hadoop.mapred.ShuffleHandler</value>
</property>
</configuration>
Edit core-site.xml
<configuration>
<property>
<name>fs.default.name</name>
<value>hdfs://localhost:9000</value>
</property>
</configuration>
Edit mapred-site.xml
<configuration>
<property>
<name>mapreduce.framework.name</name>
<value>yarn</value>
</property>
</configuration>
Before editing hdfs-site.xml,
create two directories to be used by namenode and datanode.
sudo mkdir  $HADOOP_HOME/yarn_data/hdfs/namenode
sudo mkdir  $HADOOP_HOME/yarn_data/hdfs/datanode
Edit hdfs-site.xml
<configuration>
<property>
<name>dfs.replication</name>
<value>1</value>
</property>
<property>
<name>dfs.namenode.name.dir</name>
<value>/usr/local/hadoop/yarn_data/hdfs/namenode</value>
</property>
<property>
<name>dfs.datanode.data.dir</name>
<value>/usr/local/hadoop/yarn_data/hdfs/datanode</value>
</property>
</configuration>
Edit .bashrc
Add the following lines to the end of the file.
# Set Hadoop-related environment variables
export HADOOP_PREFIX=/usr/local/hadoop
export HADOOP_HOME=/usr/local/hadoop
export HADOOP_MAPRED_HOME=${HADOOP_HOME}
export HADOOP_COMMON_HOME=${HADOOP_HOME}
export HADOOP_HDFS_HOME=${HADOOP_HOME}
export YARN_HOME=${HADOOP_HOME}
export HADOOP_CONF_DIR=${HADOOP_HOME}/etc/hadoop
# Native Path
export HADOOP_COMMON_LIB_NATIVE_DIR=${HADOOP_PREFIX}/lib/native
export HADOOP_OPTS="-Djava.library.path=$HADOOP_PREFIX/lib"
#Java path
export JAVA_HOME='/usr/local/Java/jdk1.8.0_25'
# Add Hadoop bin/ directory to PATH
export PATH=$PATH:$HADOOP_HOME/bin:$JAVA_PATH/bin:$HADOOP_HOME/sbin
Save and exit .bashrc and run
Source ~/.bashrc
Starting/Stopping the HDFS filesystem via the NameNode:
1.The first step to starting up your Hadoop installation is formatting the Hadoop filesystem which is implemented on top of the local filesystem of your cluster. You need to do this the first time you set up a Hadoop cluster. Do not format a running Hadoop filesystem as you will lose all the data currently in the cluster (in HDFS). To format the filesystem (which simply initializes the directory specified by the dfs.name.dir variable), run the
hadoop namenode -format
2.Start Hadoop by running the following command
start-dfs.sh & start-yarn.sh
OR
start-all.sh (Script Deprecated)
This will startup a Namenode, Datanode, SecondaryNameNode, ResourceManager and NodeManager on your machine.
A nifty tool for checking whether the expected Hadoop processes are running is jps
jps

Hadoop Web Interfaces:
Hadoop comes with several web interfaces which are by default available at these locations:
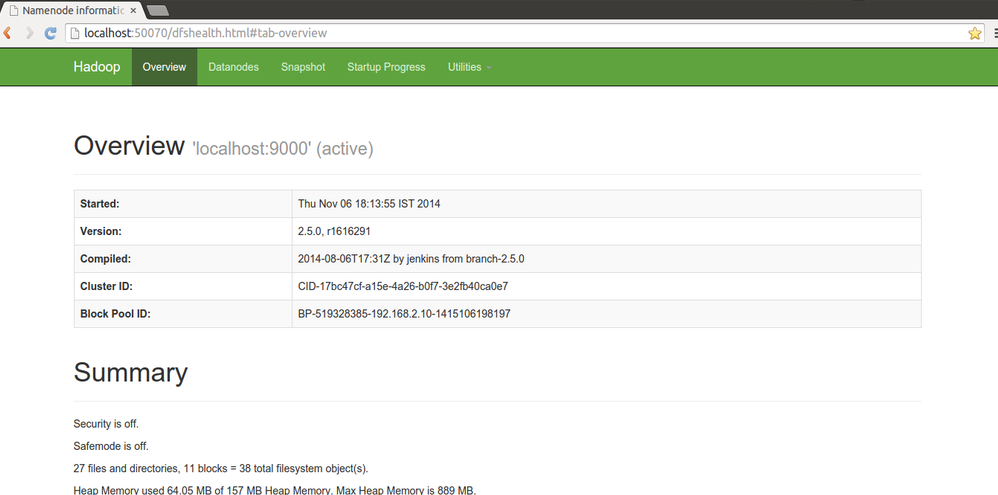
HDFS Namenode and check health using http://localhost:50070
HDFS Secondary Namenode status using http://localhost:50090
ResourceManager WebUI using http://localhost:8088


3.Stop Hadoop by running the following command
stop-dfs.sh & stop-yarn.sh
OR
stop-all.sh (Script Deprecated)
Note : So if you have worked with legacy hadoop version and switching to second generation hadoop (hadoop 2.x), you would have thought where are those jobtracker and tasktracker and how you are going to manage their role so no worry because if you have noticed the output of jps you must see two new processes running ResourceManager and NodeManager, these are introduced in hadoop 2.x as hadoop YARN. These are not the exact replacement of previous jobtracker and tasktracker but the responsilities are shared among them along with new capibilities added to hadoop. YARN stands for "Yet Another Resource Negotiator".With YARN, you can now run multiple applications in Hadoop, all sharing a common resource management. As of now YARN manages only CPU and memory but management of other resources such as disk, network and GPU is planned for the future


Cookies are important to the proper functioning of a site. To improve your experience, we use cookies to remember log-in details and provide secure log-in, collect statistics to optimize site functionality, and deliver content tailored to your interests. Click Agree and Proceed to accept cookies and go directly to the site or click on View Cookie Settings to see detailed descriptions of the types of cookies and choose whether to accept certain cookies while on the site.


About Author
Rohan Jain
Rohan is a bright and experienced web app developer with expertise in Groovy and Grails development.