Create UI for Chat in iOS using JSQ Messages ViewController
Posted By : Aditya Kumar Sharma | 07-Apr-2017
Nowadays every app has chat feature. So why don't we have this feature in our app. We are going to use a library for Chat messages for iOS which would be JSQMessagesViewController. So here we go.
cd projects/ChatterBox/
Then, create pod file:
pod init
open Podfile
Open Podfile at project location in editor add following lines in it.
pod 'JSQMessagesViewController'
and then install pod by using following command
pod install
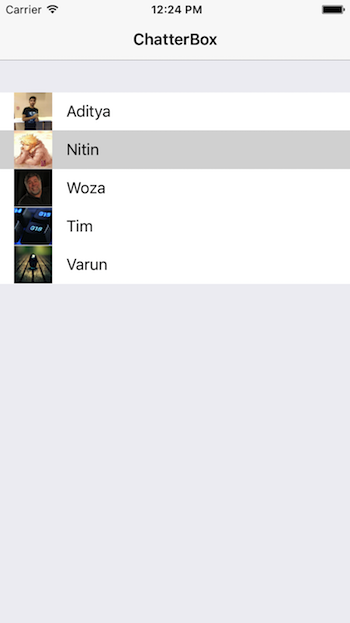
As the packages get installed close the project and open up .xcworkspace file in xCode. Now we would be creating first a tableview where a list of friends would be shown so that we have a option to chat with them. So I just used the View Controller for this, add following code in it.
import UIKit

class ViewController: UIViewController {

    @IBOutlet var chatTableView: UITableView!

    let cellIdentifier = "cellIdentifier"

    override func viewDidLoad() {
        super.viewDidLoad()
        // Do any additional setup after loading the view, typically from a nib.
        self.title = "ChatterBox"
    }

    override func didReceiveMemoryWarning() {
        super.didReceiveMemoryWarning()
        // Dispose of any resources that can be recreated.
    }
}

extension ViewController : UITableViewDelegate, UITableViewDataSource {
    func numberOfSections(in tableView: UITableView) -> Int {
        return 1
    }

    func tableView(_ tableView: UITableView, numberOfRowsInSection section: Int) -> Int {
        return persons.count
    }

    func tableView(_ tableView: UITableView, cellForRowAt indexPath: IndexPath) -> UITableViewCell {
        guard var cell = tableView.dequeueReusableCell(withIdentifier: cellIdentifier) else {
            return UITableViewCell()
        }
        cell.selectionStyle = .none
        cell = UITableViewCell.init(style: UITableViewCellStyle.default, reuseIdentifier: cellIdentifier)
        cell.textLabel?.text = persons[indexPath.row]
        cell.imageView?.image = profileImages[indexPath.row]
        return cell
    }

    func tableView(_ tableView: UITableView, didSelectRowAt indexPath: IndexPath) {
        let chatView = ChatViewController()
        chatView.displayName = persons[indexPath.row]
        let chatNavigationController = UINavigationController(rootViewController: chatView)
        present(chatNavigationController, animated: true, completion: nil)

    }
}
We just made a tableview where friend list is been shown which is been fetched from DefaultValues.swift file which we will be making below. Also we have to make handle the storyboard where we have to create a View controller and have to put a tableView object in it. Other things we have to do is make a cell and assign a identifier to it. Don't forget to asign delegate and datasource of tableview to controller and connect the table view outlet with the view controller.
Now we would be creating Default values and Unique ID for each users other than this we can also set the Profile pics in this Default values using JSQMessagesViewController
import JSQMessagesViewController

// User Enum to make it easyier to work with.

let persons = ["Aditya", "Nitin", "Woza", "Tim", "Varun"]
let profileImages: [UIImage] = [#imageLiteral(resourceName: "profileImage"), #imageLiteral(resourceName: "alex"), #imageLiteral(resourceName: "demo_avatar_woz"), #imageLiteral(resourceName: "keyboard"), #imageLiteral(resourceName: "ball")]

enum User: String {
    case Aditya = "053496-4509-288"
    case Nitin = "053496-4509-290"
    case Varun = "707-8956784-57"
    case Tim = "468-768355-23123"
    case Woza = "309-41802-93823"
}

// Helper Function to get usernames for a secific User.
func getName(_ user: User) -> String{
    switch user {
    case .Aditya:
        return "Aditya Sharma"
    case .Nitin:
        return "Nitin Bhatt"
    case .Woza:
        return "Woza Wozniak"
    case .Tim:
        return "Tim Leonard"
    case .Varun:
        return "Varun Wadhwa"
    }
}

func getUser(_ user: String) -> User {
    switch user {
    case "Aditya":
        return .Aditya
    case "Nitin":
        return .Nitin
    case "Woza":
        return .Woza
    case "Tim":
        return .Tim
    case "Varun":
        return .Varun
    default:
        return .Aditya
    }
}

func getUserId(_ user: User) -> String {
    switch user {
    case .Aditya:
        return "053496-4509-288"
    case .Nitin:
        return "053496-4509-290"
    case .Woza:
        return "309-41802-93823"
    case .Tim:
        return "468-768355-23123"
    case .Varun:
        return "707-8956784-57"
    }
}

// Create an avatar with Image

let AvatarAditya = JSQMessagesAvatarImageFactory.avatarImage(withPlaceholder: #imageLiteral(resourceName: "profileImage"), diameter: 20)!

let AvatarNitin = JSQMessagesAvatarImageFactory.avatarImage(withPlaceholder: #imageLiteral(resourceName: "alex"), diameter: 20)!

// Create avatar with Placeholder Image
let AvatarWoza = JSQMessagesAvatarImageFactory.avatarImage(withPlaceholder: #imageLiteral(resourceName: "demo_avatar_woz"), diameter: 20)!

let AvatarTim = JSQMessagesAvatarImageFactory.avatarImage(withPlaceholder: #imageLiteral(resourceName: "keyboard"), diameter: 20)!

let AvatarVarun = JSQMessagesAvatarImageFactory.avatarImage(withPlaceholder: #imageLiteral(resourceName: "ball"), diameter: 20)!

// Helper Method for getting an avatar for a specific User.
func getAvatar(_ id: String) -> JSQMessagesAvatarImage{
    let user = User(rawValue: id)!

    switch user {
    case .Aditya:
        return AvatarAditya
    case .Nitin:
        return AvatarNitin
    case .Woza:
        return AvatarWoza
    case .Tim:
        return AvatarTim
    case .Varun:
        return AvatarVarun
    }
}
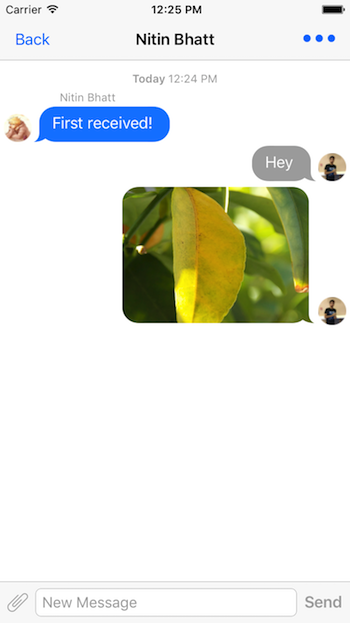
Now comes the main screen that is chat Screen where we are using JSQMessagesViewController which consist of UICollectionViewController that are customized for chat interface. In this section we would doing following things:
- Would be displaying the friend name from whom we are chatting at navigation bar title.
- Would be getting unique ID and name for that person.
- Then we would be cretaing Incoming and Outgoing Bubble properties.
- Will define the accessory button where user can send photo, video, location, etc.
- Then JSQMessages Collection view DataSource methods are been defined for showing messages which would be overriden.
This file you can get from my git repository : https://github.com/aditya5045/ChatterBox/blob/master/ChatterBox/ChatViewController.swift
Thanks


Cookies are important to the proper functioning of a site. To improve your experience, we use cookies to remember log-in details and provide secure log-in, collect statistics to optimize site functionality, and deliver content tailored to your interests. Click Agree and Proceed to accept cookies and go directly to the site or click on View Cookie Settings to see detailed descriptions of the types of cookies and choose whether to accept certain cookies while on the site.


About Author
Aditya Kumar Sharma
Aditya is a bright iOS developer, have knowledge of objective C, swift, swift 3, JSON, Core data and iPhone development. Apart from that he loves to travel and explore new things.