Setup SonarQube in Android Application and Generate Reports
Posted By : Keshav Gupta | 25-Dec-2018

App developers expect their apps to be free from errors. But in spite of taking all the necessary measures of preventing their apps from glitch they end up with an app that constantly faces a downtown.
To find a solution to this problem Oodles Technologies developers use SonarQube. SonarQube gives the developers an ability to demonstrate the health of an application as well as feature issues they face. With a quality Gate set up, our developers settle the hole and in this way, they enhance the code quality instantly.
SonarQuba is a continuous inspection tool. Using SonarQube, our developers have everything within reach to take responsibility for the nature of the code. Our Android app development company use this platform to set up code health in mobile application development. It helps us generate reports of the code and track each line of code. Overall, SonarQube maintains the health of code, focus on the leak, enforce quality gate and dig into the issues.
Prerequisites Tools Used by Oodles:
1. Android Studio
2. Java 7 orJava 8
Steps Explanation :
SonarQube configuration and installation involves two steps.
First software developers Install SonarQube on a local machine and then configure it in the application.
Let us look at the steps Oodles developers follow while installing SonarQube on the system.
Step1: Downloading SonarQube from SonarQube official website using visiting path "https://www.sonarqube.org/downloads/ ". Developers add here community edition as it is a free source.
Step2: You will be getting a zipped folder of the downloaded file. Unzip it and you will get SonarQube installation directory in "/bin" for each platform like Windows, Linux, Mac and chose yours. Mine is Linux. So I will choose lnux_x86_x64.
Step3: Go to /bin/linux-x86-64/.Then you will find a sonar.sh file. Open your system terminal and run this command "./sonar.sh start".Now SonarQube server has been started on the machine.
Step4: Just Open "http://localhost:9000" and welcome admin panel of SonarQube.Now login with "admin" as username and password on the login portal and Now you will see the dashboard of SonarQube successfully.
Now the installation is completed let’s proceed and configure in android application to get the reports.
Step5: After this, developers open the project level build.gradle file. Add classpath dependencies to install SonarQube to scan and use
buildscript {

    repositories {
        google()
        jcenter()
    }
    dependencies {
        classpath 'com.android.tools.build:gradle:3.2.1'
        classpath "org.sonarsource.scanner.gradle:sonarqube-gradle-plugin:2.6"
        classpath "com.dicedmelon.gradle:jacoco-android:0.1.1"

    }
}
Step6: Add these plugins in app/build.gradle below the android plugin like this. The code appears like this:
apply plugin: 'com.android.application'
apply plugin: 'org.sonarqube'
apply plugin: 'jacoco-android'
Step7: Now we will add these Sonar scanning inputs below of app/build.gradle file. The code will show up like this:
sonarqube {
    sonarqube {
        properties {
            property "sonar.projectName", "SonarQubeSample"
            property "sonar.projectKey", "SonarQubeSample"
            property "sonar.host.url", "http://localhost:9000"
            property "sonar.projectVersion", "1.0"
            property "sonar.language", "java"
            property "sonar.sources", "src/main/"
        }
    }

}
Step8: Sync the project. After the successful syndication just run following command from your AndroidStudio terminal and It will take some time to execute and when it shows "build successfully" completed.
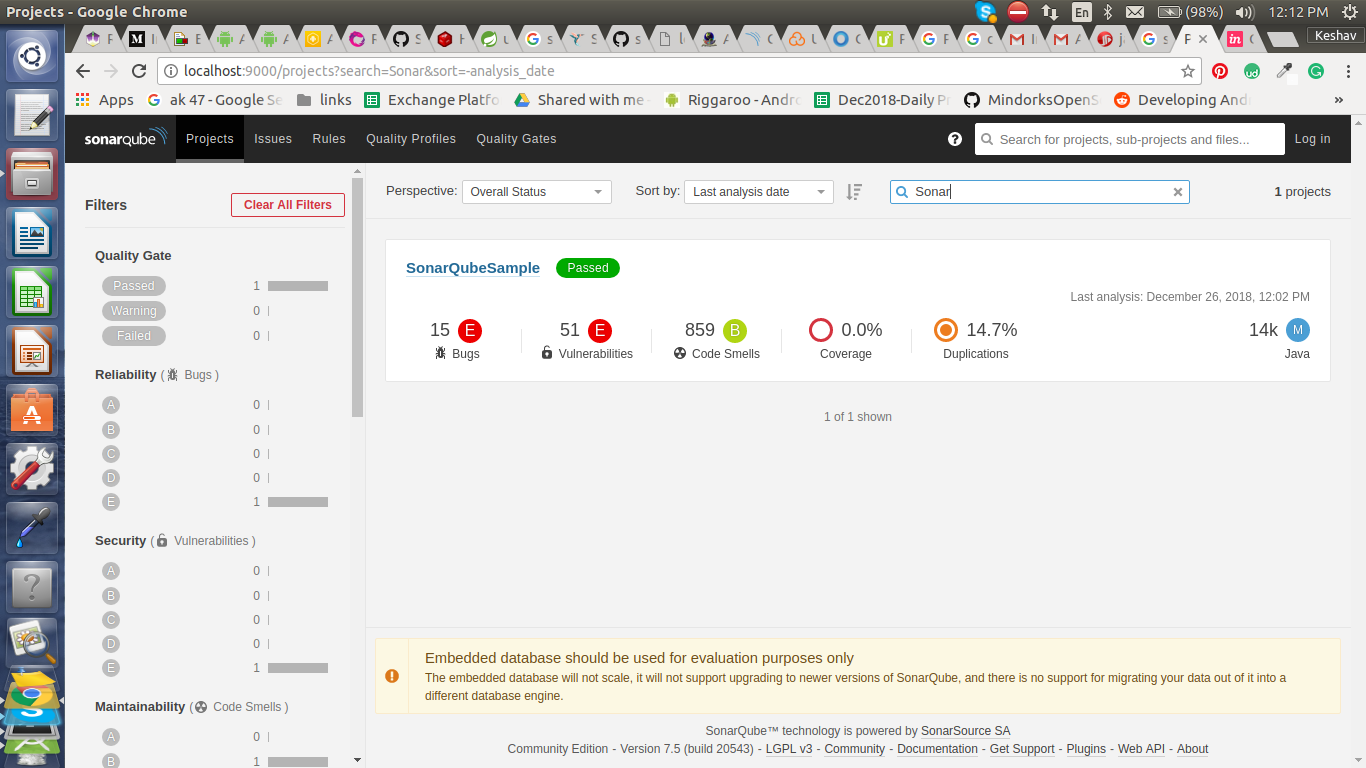
You can reach out on your "http://localhost:9000/projects" panel and check project SonarQubeSample has been generated or not. For further reports of your scanned project by clicking over it and explore it. Command is
./gradlew sonar
Output Results: after the successful installation of SonarQube, Check its
Concluding Thoughts
SonarQube is a useful tool to maintain the health of an application including Android and iOS apps. It tracks and fixes bugs and help developers track the code systematically. Tracking enables the software developers to write clean and improved code and help increase their code standards rapidly.
Are you thinking of integrating your mobile apps with SonarQube? Contact Oodles Technologies- one of the leading Android Application Development Companies in India. We offer feature loaded mobile apps, software solutions, blockchain services and more. Apart from this, we provide our clients' solutions on migrating from one software to the other. For more details on software development services contact our experts now!


Cookies are important to the proper functioning of a site. To improve your experience, we use cookies to remember log-in details and provide secure log-in, collect statistics to optimize site functionality, and deliver content tailored to your interests. Click Agree and Proceed to accept cookies and go directly to the site or click on View Cookie Settings to see detailed descriptions of the types of cookies and choose whether to accept certain cookies while on the site.


About Author
Keshav Gupta
Keshav Gupta is Android Developer in Oodles, he always look forward for new tasks and new things to learn more.