Send Emails With NodeJS
Posted By : Hotam Singh | 19-May-2018
Sending emails is very important part in each kind of application. We use sending e-mail’s for many purposes i.e account verification, reset password, promotion and alert notification etc.
In my today's tutorial, I am going to discuss sending emails in nodejs . There is very much popular module in nodejs for this purpose. So let's get started.
What I'll cover in this tutorial is:
- Introduction to
nodemailer - Getting started with
nodemailer - sending emails using Gmail
Introduction to
Nodemailer is a very popular module for NodeJS applications for sending emails.
Nodemailer features:
* It is a module with zero dependencies it means no other modules are required to getting started with.
* Focus on security concerns: Secure email delivery using TLS/STARTTLS
* Nodemailer supports Unicode: you can use any characters, emoji etc.
* Supports HTML as well as plain text as content
* You can add attachments to your emails
* Supports many transport methods with default SMTP support
* OAuth authentication
* Autogenerated emails from Ethereal.email
Getting Started with nodemailer
To get started with nodemailer , we need Node.js version v6+. Earlier versions of nodejs don't support nodemailer .
Let's understand the process of sending emails in short:
* Create a transporter using nodemailer . Nodemailer supports many transport mechanism. The default is SMTP.
* Set up message options i.e sender, receiver, message content etc.
* Nodemailer provides sendMail() method by which we can deliver the message using your transporter created in the first step.
Now understand these above steps using a code example:
For this, we'll use nodejs's default email service Ethereal.email as I explained the last feature of nodemailer .
Create a new file test.js and paste below code
'use strict';
const nodemailer = require('nodemailer');

// Generate test SMTP service account from ethereal.email
// Only needed if you don't have a real mail account for testing
nodemailer.createTestAccount((err, account) => {

    // Explained as 3 steps process as I explaned in tutorial

    //Step: 1 Create transporter
    let smtpConfig = {
        host: 'smtp.ethereal.email',
        port: 587,
        secure: false, // true for 465, false for other ports. For TLS use port 465
        auth: {
            user: account.user, // generated ethereal user
            pass: account.pass // generated ethereal password
        }
    };

    let transporter = nodemailer.createTransport(smtpConfig);

    //Step: 2 Setup message options
    let mailOptions = {
        from: '"Fred Foo ??" <[email protected]>', // sender address
        to: '[email protected], [email protected]', // list of receivers i.e [sneder1, sender2, sender3, ....]
        subject: 'Hello ?', // Subject line
        text: 'Hello world?', // plain text body
        html: '<b>Hello world?</b>' // html body
    };

    //Step: 3 Send mail using created transport
    transporter.sendMail(mailOptions, (error, info) => {
        if (error) {
            return console.log(error);
        }
        console.log('Message sent: %s', info.messageId);
        console.log('Preview URL: %s', nodemailer.getTestMessageUrl(info));

        // Message sent: <[email protected]>
        // Preview URL: https://ethereal.email/message/WaQKMgKddxQDoou...
    });
});
When you run
$ node test.js
you will get something like below on your terminal

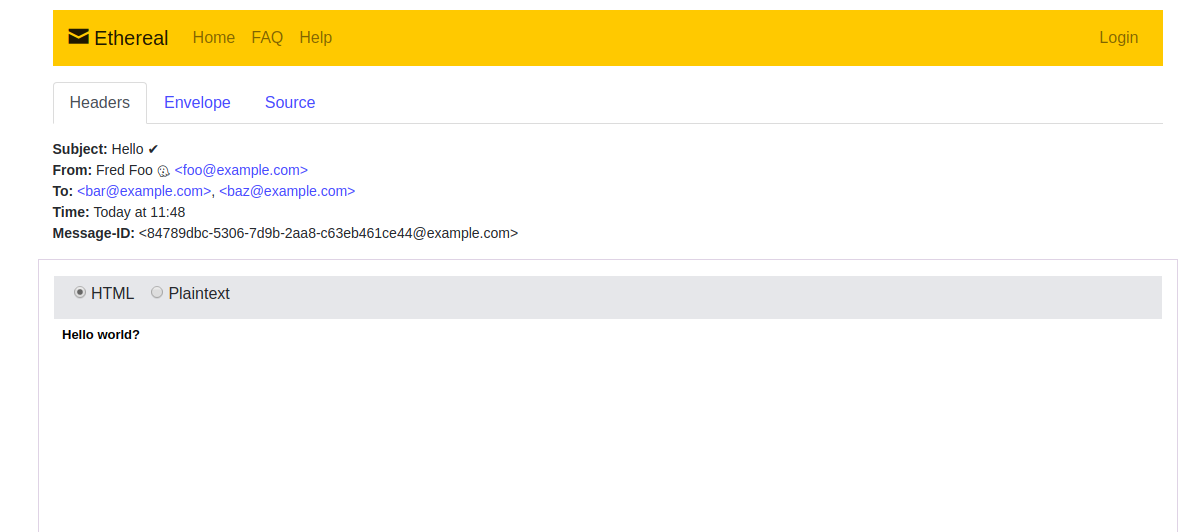
And when you will click preview URL, you will get your email details on the browser
Sending emails using your
To send emails using your gmail account, I will explain two methods
1. Send using email/password.
2. Send using OAuth2
1. Send emails using email/password
create a new file test2.js and paste code .
var nodemailer = require('nodemailer');
var tarnsporter = nodemailer.createTransport({
    service: 'gmail',
    auth: {
        user: 'your gmail address',
        pass: 'your gmail password'
    }
});

var mailOptions = {
    from: '[email protected]', // sender address
    to: '[email protected]', // list of receivers
    subject: 'Hello', // Subject line
    text: 'Hello world ?', // plain text body
    html: '<b>Hello world ?</b>' // html body
};

tarnsporter.sendMail(mailOptions, function (err, info) {
    if (err) {
        console.log('error : ' + err);
        return;
    }
    console.log('mail sent successfully');
});
Run this file using
$ node test2.js
If you get an error like error : Error: Invalid login: 534-5.7.14
Just go to below URL and ON less secure apps option
And try to run again this file. You will see "mail sent successfully" message on the console. And you can check email as well for confirmation.
Note: I will never recommend this approach as it may have security breaches. It is good to get started. Use OAuth authentication as nodemailer supports OAuth authentication. It is secure and safe to use. In the next example, I am going to discuss OAuth authentication.
2. Send emails using OAuth authentication
create a new file test3.js and paste below code.
var nodemailer = require('nodemailer');

var transporter = nodemailer.createTransport({
    host: 'smtp.gmail.com',
    port: 465,
    secure: true,
    auth: {
        type: 'OAuth2',
        clientId: 'YOUR_GMAIL_ACCOUNT_CLIENT_ID',
        clientSecret: 'YOUR_GMAIL_ACCOUNT_CLIENT_SECRET'
    }
});


var mailOptions = {
    from: '[email protected]', // sender address
    to: '[email protected]', // list of receivers
    subject: 'Hello', // Subject line
    text: 'Hello world ?', // plain text body
    html: '<b>Hello world ?</b>', // https://drive.google.com/open?id=1NXO7RZFijpRBNTGLHWJ_ITlweT7gHRdphtml body
    auth: {
        user: '[email protected]',
        refreshToken: 'YOUR_GMAIL_ACCOUNT_REFRESH_TOKEN',
        accessToken: 'YOUR_GMAIL_ACCOUNT_ACCESS_TOKEN'
    }
};

transporter.sendMail(mailOptions, function (err, info) {
    if (err) {
        console.log('error : ' + err);
        return;
    }
    console.log('mail sent successfully');
});
Try to run this file using
$ node test3.js
You will get "Mail sent successfull" message if no everything goes well. You can check your email for the confirmation as well.
Note: If you want to get CLIENT_ID/CLIENT_SECRET/ACCESS_TOKEN/REFRESH_TOKEN of your gmail account, you can follow instructions as on my github account tutorial.
Happy Coding!


Request for Proposal
Cookies are important to the proper functioning of a site. To improve your experience, we use cookies to remember log-in details and provide secure log-in, collect statistics to optimize site functionality, and deliver content tailored to your interests. Click Agree and Proceed to accept cookies and go directly to the site or click on View Cookie Settings to see detailed descriptions of the types of cookies and choose whether to accept certain cookies while on the site.


About Author
Hotam Singh
Hotam has 1.5 years of experience in Node.JS. He has worked on Front End, JavaScript, Jquery, Backbone.JS, Database: MySQL, MongoDB. His hobbies are playing Sudoku/Puzzles and watching movies.