Developing apps with AppGyver Steroids and PhoneGap
Posted By : Ravi Sharma | 18-Nov-2013
Steroids builds on top of PhoneGap and finally fixes the performance.Steroids is fully backwards compatible with PhoneGap. PhoneGap plugins work directly with Steroids.
For the first time, developers are able to create HTML5-based apps that feel native.
Steroids comes with PhoneGap built-in and fully functional. All the APIs you know and love are available just as if you were using PhoneGap. All the plugins, too – even your own ones.
Getting started with Steroids
1 Create free account
Appgyver account
2 Install the Required Tools
First, you need to make sure that you have some tools set up that are required by certain third party Node.js libraries that the Steroids CLI uses:
Git (certain libraries download some of their assets from Git repositories)
On Windows, be sure to select the "Use Git from Windows Command Prompt" option in the install wizard.
Python v2.7 or higher
On Windows, be sure to select the "Add python.exe to Path" feature in the install wizard.
On OS X, Python should be preinstalled. You can check your version by running $ python in the Terminal.
OS X only: Xcode 5 with Command Line Tools (for code compilation)
Note that the Command Line Tools are not installed by default. In the Xcode top menu, select Xcode > Preferences. Then, in the Downloads tab, find the Command Line Tools and click Install.
3 Install NVM and Node.js
$ curl https://raw.github.com/creationix/nvm/master/install.sh | sh
$ nvm install 0.10
$ nvm use 0.10
$ nvm alias default 0.10
4 Install the Steroids CLI package
$ npm install steroids -g
Athough steroids prefer this method over installing node.js from there site but second one is more errorfree.
Once you are done with installation just type steroids in CLI to check for correct installation.
Also install cordova and create a test project
Let us create a demo project for Steroid now
$ steroids create myProject
$ cd myProject
then,
$ steroids login
$ steroids connect
now if you are testing for Android make your device and pc are on same WLAN
for ios you can simply use steroids simulator in new terminal.
steroids connect takes you to a url whereit provides QRcode which you scan by using Appgyver scanner app available on playstore.
Staring point here is the index.html
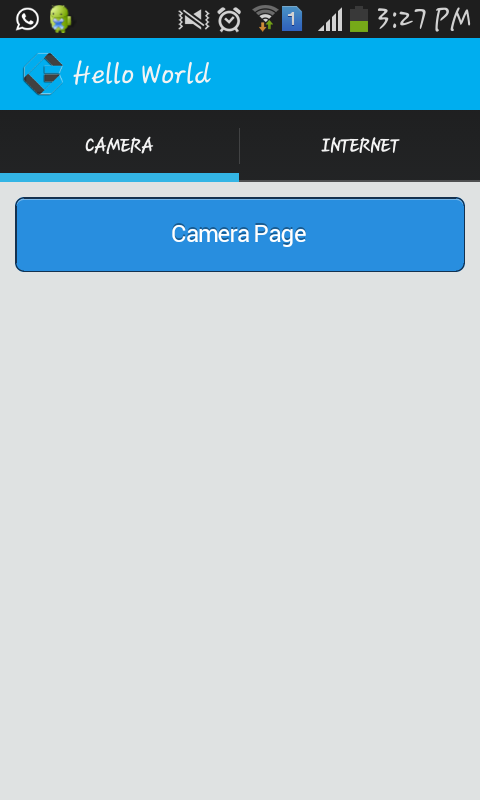
	<!DOCTYPE html>

	<html>

	<head>

	  <meta charset="utf8">

	  <meta name="viewport" content="width=device-width">

	  <title>My Steroids App</title>


	  <link rel="stylesheet" href="vendor/topcoat/css/topcoat-mobile-light.css" />

	  <link rel="stylesheet" href="stylesheets/application.css" />


	  <script src="javascripts/onerror.js"></script>

	  <script src="javascripts/console.log.js"></script>


	  <!-- cordova.js is served from localhost to ensure the correct version -->

	  <script src="http://localhost/appgyver/cordova.js"></script>

	  <script src="components/steroids-js/steroids.js"></script>


	  <script src="javascripts/application.js"></script>

	</head>

	<body>

	  <div class="content-padded">

	    <a class="topcoat-button--cta center full" ontouchend="openCameraPage()">Camera Page</a>

	  </div>

	</body>

	</html>
We have created a button which when touched calls the openCameraPage() in application.js
Our app uses tab bar for that make changes to application.coffee file in config and uncomment following.
	steroids.config.tabBar.enabled = true

	steroids.config.tabBar.tabs = [

	{

	title: "Camera"

	icon: "icons/[email protected]"

	location: "http://localhost/index.html"

	},

	   {

	     title: "Internet"

	     icon: "icons/[email protected]"

	     location: "http://www.google.com"

	   }

	]
Here we call index.html on click of first tab and open google on click of second.
Here is the application.js file.
//Add navigation bar to application
steroids.view.navigationBar.show("Oodles Technologies");
//open camera page
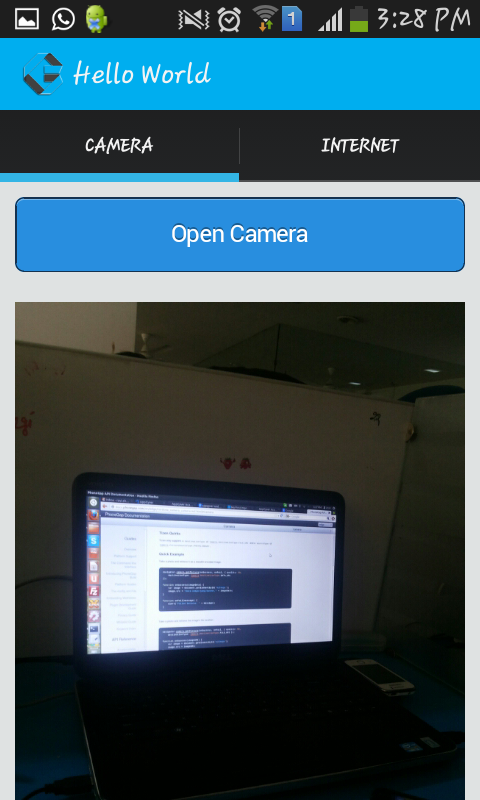
function openCameraPage() {
var webView = new steroids.views.WebView("camera.html"); // add camera.html page to steroids webView
steroids.layers.push(webView); // push camera Webview to current steroids layer
}
//open camera using cordova api
function cameraGetPicture() {
navigator.camera.getPicture(imageReceived, // success callback
cameraFail, // failure callback
{
quality: 100,
destinationType: Camera.DestinationType.DATA_URL,
correctOrientation: true,
targetWidth: 600
});
}
//success callback function for camera
function imageReceived(imageURI) {
var image = document.querySelector('img#myImage');
image.src = "data:image/jpeg;base64," + imageURI;
}
//failure callback function for camera
function cameraFail(message) {
alert("Camera error: " + message);
}
This js includes navigationBar code, and opening the camera html page which initiates camera and checks for success or failure callback.
In order to run on Android enter
Here is the output from android phone
and from ios device


You may download code from here
Thanks,
Ravi Sharma


Cookies are important to the proper functioning of a site. To improve your experience, we use cookies to remember log-in details and provide secure log-in, collect statistics to optimize site functionality, and deliver content tailored to your interests. Click Agree and Proceed to accept cookies and go directly to the site or click on View Cookie Settings to see detailed descriptions of the types of cookies and choose whether to accept certain cookies while on the site.


About Author
Ravi Sharma
Ravi Sharma is an Android application developer with experience in Java , Titanium and Phonegap frameworks. Ravi loves drawing and PC games.