Build a Android app with an App Engine backend
Posted By : Ravi Sharma | 13-Nov-2013

Google App Engine is a cloud computing platform for hosting web application in existing Google infrastructure, it’s easy to scale, manage and free to use up to a predefined consumed resources, and it supports Java.
This tutorial describes how to develop a mobile application powered by Google Cloud Platform. The application includes an Android client and an App Engine backend.
The following figure shows the main components of such application.

To get started you have to download Google Plugin for Eclipse which you can get from here.
https://developers.google.com/eclipse/docs/download
Based on eclipse version choose the link
To install go to Help-> Install New Software -> Add , enter path there.
Select all options excluding NDK Plugins

Installation will take some time.
To check that installation is successful look for Google Services and Development Tools icon ( g icon ) in toolbar for eclipse or
do New-> Android, if you see App Engine Connected Android Project , you are on right track.
Just fill in the Project name and you will see that server side project also gets created by itself as your_project_name-App Engine
Also if project asks for a compatible App Engine SDK just download one such and give its path. By default it downloads sdk version 1.8.7 which is compatible only for java 7 for java 6 download sdk 1.7.7.
In mobile app you will see predefined files and endpointl lib folder which are used to interact with server.
Here is the GCM file where you are supposed to enter the project number which you obtain once a project is made on api console also turn on the Google Cloud Messaging option, to receive notification.
public class GCMIntentService extends GCMBaseIntentService {
  private final Deviceinfoendpoint endpoint;


  protected static final String PROJECT_NUMBER = "1038962855965";


  public static void register(Context mContext) {
    GCMRegistrar.checkDevice(mContext);
    GCMRegistrar.checkManifest(mContext);
    GCMRegistrar.register(mContext, PROJECT_NUMBER);
  }


  public static void unregister(Context mContext) {
    GCMRegistrar.unregister(mContext);
  }

  public GCMIntentService() {
    super(PROJECT_NUMBER);
    Deviceinfoendpoint.Builder endpointBuilder = new Deviceinfoendpoint.Builder(
        AndroidHttp.newCompatibleTransport(), new JacksonFactory(),
        new HttpRequestInitializer() {
          public void initialize(HttpRequest httpRequest) {
          }
        });
    endpoint = CloudEndpointUtils.updateBuilder(endpointBuilder).build();
  }


  @Override
  public void onError(Context context, String errorId) {

    sendNotificationIntent(
        context,
        "Registration with Google Cloud Messaging...FAILED!\n\n"
            + "A Google Cloud Messaging registration error occurred (errorid: "
            + errorId
            + "). "
            + "Do you have your project number ("
            + ("".equals(PROJECT_NUMBER) ? ""
                : PROJECT_NUMBER)
            + ")  set correctly, and do you have Google Cloud Messaging enabled for the "
            + "project?", true, true);
  }


  @Override
  public void onMessage(Context context, Intent intent) {
    sendNotificationIntent(
        context,
        "Message received via Google Cloud Messaging:\n\n"
            + intent.getStringExtra("message"), true, false);
  }


  @Override
  public void onRegistered(Context context, String registration) {

    boolean alreadyRegisteredWithEndpointServer = false;

    try {


      DeviceInfo existingInfo = endpoint.getDeviceInfo(registration)
          .execute();

      if (existingInfo != null && registration.equals(existingInfo.getDeviceRegistrationID())) {
        alreadyRegisteredWithEndpointServer = true;
      }
    } catch (IOException e) {
      // Ignore
    }

    try {
      if (!alreadyRegisteredWithEndpointServer) {

        DeviceInfo deviceInfo = new DeviceInfo();
        endpoint.insertDeviceInfo(
            deviceInfo
                .setDeviceRegistrationID(registration)
                .setTimestamp(System.currentTimeMillis())
                .setDeviceInformation(
                    URLEncoder
                        .encode(android.os.Build.MANUFACTURER
                            + " "
                            + android.os.Build.PRODUCT,
                            "UTF-8"))).execute();
      }
    } catch (IOException e) {
      Log.e(GCMIntentService.class.getName(),
          "Exception received when attempting to register with server at "
              + endpoint.getRootUrl(), e);

      sendNotificationIntent(
          context,
          "1) Registration with Google Cloud Messaging...SUCCEEDED!\n\n"
              + "2) Registration with Endpoints Server...FAILED!\n\n"
              + "Unable to register your device with your Cloud Endpoints server running at "
              + endpoint.getRootUrl()
              + ". Either your Cloud Endpoints server is not deployed to App Engine, or "
              + "your settings need to be changed to run against a local instance "
              + "by setting LOCAL_ANDROID_RUN to 'true' in CloudEndpointUtils.java.",
          true, true);
      return;
    }

    sendNotificationIntent(
        context,
        "1) Registration with Google Cloud Messaging...SUCCEEDED!\n\n"
            + "2) Registration with Endpoints Server...SUCCEEDED!\n\n"
            + "Device registration with Cloud Endpoints Server running at  "
            + endpoint.getRootUrl()
            + " succeeded!\n\n"
            + "To send a message to this device, "
            + "open your browser and navigate to the sample application at "
            + getWebSampleUrl(endpoint.getRootUrl()), false, true);
  }
While in server project in MessageEndPoint file, add the api key of your project.
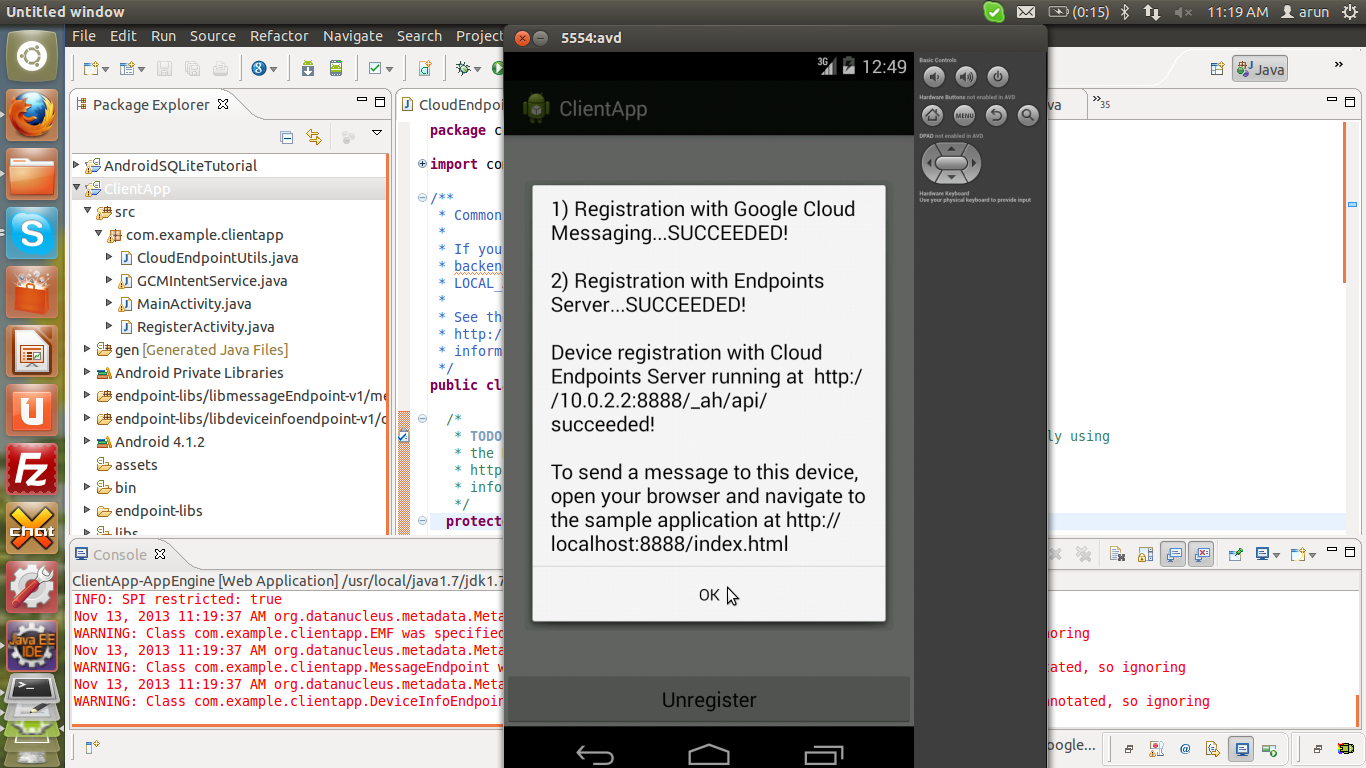
As you run the app you will see the Register button clicking on which an intent will be send showing whether registration with GCM, endpoint server was successful or not .
If succesful, you will see
For local server you have to make sure the LOCAL_ANDROID_RUN boolean variable is set to true.
Start the App Engine app (right click > Run as > Web Application).
Run your Android application in your emulator running a target with Google APIs.
Access the backend UI to view registered devices and send GCM messages to them:
http://localhost:8888
After you send notification , you will see the following output,

Thanks,
Ravi Sharma


Cookies are important to the proper functioning of a site. To improve your experience, we use cookies to remember log-in details and provide secure log-in, collect statistics to optimize site functionality, and deliver content tailored to your interests. Click Agree and Proceed to accept cookies and go directly to the site or click on View Cookie Settings to see detailed descriptions of the types of cookies and choose whether to accept certain cookies while on the site.


About Author
Ravi Sharma
Ravi Sharma is an Android application developer with experience in Java , Titanium and Phonegap frameworks. Ravi loves drawing and PC games.