Installing Hadoop (Pseudo Mode) on ubuntu and other Linux environments
Posted By : Abhimanyu Singh | 15-Nov-2012
HADOOP enables applications to work with thousands of computation-independent application and petabytes of data . Hadoop is used mainly for distributed data processing but we can installed it in standalone mode and pseudo-distributed mode . In this Blog we will look to install Hadoop in pseudo-distributed mode .
Installation Modes of Hadoop
Standalone Mode - Hadoop will installed on local system .
Pseudo-Distributed - This mode of installation is sufficient for a cluster of few systems.
Fully-Distributed Mode - In this mode of Installation Hadoop is fully utilized . In this mode mode Hadoop is used to processed the data distributed over a number of systems.
As we are looking for Pseudo-distributed mode installation of Hadoop , Before going further we have a look on configuration of Hadoop in this mode.
Pre-requisites for Hadoop installation
- Operating-system - GNU/Linux
- JAVA - Java must be installed on your operating system for hadoop working. Java 1.6 or later
- ssh must be enabled on the machine.
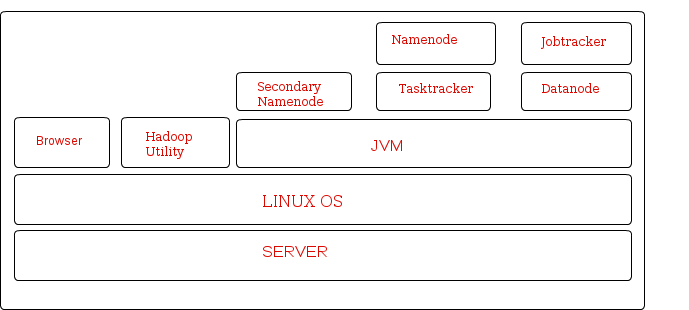
Hadoop Daemons run on JVM . Namenode , Jobtracker , Secondary Namenode , Tasktracker and Datanode are the daemons. Lets us look on functionality of these daemon. It will give a little idea about Hadoop working.
- Namenode : The Namenode is the master server in Hadoop and manages the file system namespace and access to the file stored in cluster.
- Secondary Namenode : It provides period checkpoints and housekeeping tasks.
- Datanode : The Datanode manages the storage attached to a node of which there can be multiple node attached to the cluster. Each node storing data will have a datanode daemon running.
- Jobtracker : It is responsible for scheduling work at the data nodes. Jobtracker distributes work across data nodes.
- Tasktracker: Tasktracker performs the actual task.
- Install JAVA on the machine.
-
sudo add-apt-repository ppa:webupd8team/java
sudo apt-get update
sudo apt-get install oracle-java7-installer
Set JAVA HOME and PATH environment variable for java in ~/.bashrc
- Run command “# ssh localhost “ to check whether ssh is installed or not .
- If ssh is not installed run command sudo apt-get install openssh-server openssh-client
- Create a new file # vi /etc/apt/sources.list.d/cloudera.list
- Add the following below line in above file
- Add the gnu-public license key using following command
- Now update using following command
- Search Hadoop related packages using following command
- Install lipzip1
- Install Hadoop and all daemons on the machine
- GO to {hadoop_installation_directory}/conf
- Starting all the Daemons on the machine - run the below command in your terminal
- Testing Hadoop installation
- Checking the status of live datanodes
- checking the status of finished job
INSTALLATION
(on Ubuntu)
deb http://archive.cloudera.com/debian
where: RELEASE is the name of your distribution, which you can find by running lsb_release -c. For example, to install CDH3 for Ubuntu Lucid, use lucid-cdh3 in the command above.
I used release : maverick-cdh3
# curl -s http://archive.cloudera.com/debian/archive.key | sudo apt-key add -
It gives “ok” on successful execution.
sudo apt-get update
# apt-cache search hadoop
    # wget http://security.ubuntu.com/ubuntu/pool/main/libz/libzip/libzip1_0.9-3ubuntu0.1_i386.deb
    # sudo dpkg -i libzip1_0.9-3ubuntu0.1_i386.deb
#sudo apt-get install hadoop-0.20-conf-pseudo
edit hadoop-env.sh
add export JAVA_HOME=
# /etc/init.d/hadoop-0.20-conf-
where daemons are datanode,secondarynamenode,jobtracker,tasktracker,namenode
run the below command in CLI
# hadoop jar /usr/lib/hadoop-0.20/hadoop-examples.jar pi 2 100000
if the above command print the pi value successfully is sign of hadoop successful installation.
output of above command :
oodles@oodles-Inspiron-N5050:/usr/lib/hadoop$ hadoop jar /usr/lib/hadoop-0.20/hadoop-examples.jar pi 2 100000
Number of Maps  = 2
Samples per Map = 100000
Wrote input for Map #0
Wrote input for Map #1
Starting Job
12/11/05 10:51:20 INFO mapred.FileInputFormat: Total input paths to process : 2
12/11/05 10:51:21 INFO mapred.JobClient: Running job: job_201211050809_0001
12/11/05 10:51:22 INFO mapred.JobClient:  map 0% reduce 0%
12/11/05 10:51:31 INFO mapred.JobClient:  map 100% reduce 0%
12/11/05 10:51:41 INFO mapred.JobClient:  map 100% reduce 100%
12/11/05 10:51:43 INFO mapred.JobClient: Job complete: job_201211050809_0001
12/11/05 10:51:43 INFO mapred.JobClient: Counters: 27
12/11/05 10:51:43 INFO mapred.JobClient:   Job Counters
12/11/05 10:51:43 INFO mapred.JobClient:     Launched reduce tasks=1
12/11/05 10:51:43 INFO mapred.JobClient:     SLOTS_MILLIS_MAPS=13288
12/11/05 10:51:43 INFO mapred.JobClient:     Total time spent by all reduces waiting after reserving slots (ms)=0
12/11/05 10:51:43 INFO mapred.JobClient:     Total time spent by all maps waiting after reserving slots (ms)=0
12/11/05 10:51:43 INFO mapred.JobClient:     Launched map tasks=2
12/11/05 10:51:43 INFO mapred.JobClient:     Data-local map tasks=2
12/11/05 10:51:43 INFO mapred.JobClient:     SLOTS_MILLIS_REDUCES=10035
12/11/05 10:51:43 INFO mapred.JobClient:   FileSystemCounters
12/11/05 10:51:43 INFO mapred.JobClient:     FILE_BYTES_READ=50
12/11/05 10:51:43 INFO mapred.JobClient:     HDFS_BYTES_READ=482
12/11/05 10:51:43 INFO mapred.JobClient:     FILE_BYTES_WRITTEN=180803
12/11/05 10:51:43 INFO mapred.JobClient:     HDFS_BYTES_WRITTEN=215
12/11/05 10:51:43 INFO mapred.JobClient:   Map-Reduce Framework
12/11/05 10:51:43 INFO mapred.JobClient:     Map input records=2
12/11/05 10:51:43 INFO mapred.JobClient:     Reduce shuffle bytes=56
12/11/05 10:51:43 INFO mapred.JobClient:     Spilled Records=8
12/11/05 10:51:43 INFO mapred.JobClient:     Map output bytes=36
12/11/05 10:51:43 INFO mapred.JobClient:     Total committed heap usage (bytes)=379191296
12/11/05 10:51:43 INFO mapred.JobClient:     CPU time spent (ms)=2200
12/11/05 10:51:43 INFO mapred.JobClient:     Map input bytes=48
12/11/05 10:51:43 INFO mapred.JobClient:     Combine input records=0
12/11/05 10:51:43 INFO mapred.JobClient:     SPLIT_RAW_BYTES=246
12/11/05 10:51:43 INFO mapred.JobClient:     Reduce input records=4
12/11/05 10:51:43 INFO mapred.JobClient:     Reduce input groups=2
12/11/05 10:51:43 INFO mapred.JobClient:     Combine output records=0
12/11/05 10:51:43 INFO mapred.JobClient:     Physical memory (bytes) snapshot=399249408
12/11/05 10:51:43 INFO mapred.JobClient:     Reduce output records=0
12/11/05 10:51:43 INFO mapred.JobClient:     Virtual memory (bytes) snapshot=1193230336
12/11/05 10:51:43 INFO mapred.JobClient:     Map output records=4
Job Finished in 23.885 seconds
Estimated value of Pi is 3.14118000000000000000
Test 2
                1. #hadoop fs -mkdir /foo
                2. #hadoop fs -ls /
                    output ?
                              drwxr-xr-x   - oodles supergroup          0 2012-11-05 10:55 /foo
                              drwxr-xr-x   - oodles supergroup          0 2012-11-03 21:24 /user
                              drwxr-xr-x   - mapred supergroup          0 2012-11-03 21:24 /var
                 3. #hadoop fs -rmr /foo
                     output ?
                                Deleted hdfs://localhost:8020/foo
http://localhost:50070/dfshealth.jsp
http://localhost:50030/jobtracker.jsp
you could see pi estimator job in completed the job if task 1 is run successfully on your machine.


Cookies are important to the proper functioning of a site. To improve your experience, we use cookies to remember log-in details and provide secure log-in, collect statistics to optimize site functionality, and deliver content tailored to your interests. Click Agree and Proceed to accept cookies and go directly to the site or click on View Cookie Settings to see detailed descriptions of the types of cookies and choose whether to accept certain cookies while on the site.


About Author
Abhimanyu Singh
Abhimanyu is an seasoned technologist . He always keeps himself ahead in embracing and adapting new technologies/frameworks to solve business problems. He specialise in Blockchain technology , Video Content Management & enterprise software .