Giving Ratings in Titanium
Posted By : Akshay Luthra | 06-May-2015
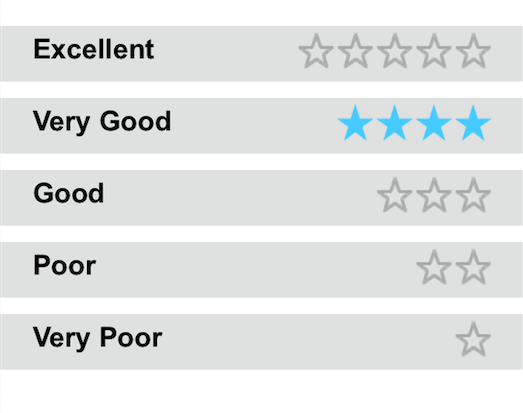
This blog explains how to make a Ratings view in a Titanium app to give review to a feature or a product. The view being made in this blog works both on iOS and Android.
In your "app.js", write the following code -
 Titanium.UI.setBackgroundColor('#fff');

var win = Ti.UI.createWindow({
	title : 'The Main Window',
	backgroundColor : '#fff'
});

var view = Ti.UI.createView({
	width : Ti.UI.FILL,
	height : Ti.UI.FILL,
});
win.add(view);

var tableView = Ti.UI.createTableView({
	top : 40,
	showVerticalScrollIndicator : false,
	separatorColor : "transparent",
	separatorStyle : "NONE",
	height : Ti.UI.SIZE,
	scrollable : false,
	backgroundColor : "transparent",
});
view.add(tableView);

var scoreItems = ["Excellent", "Very Good", "Good", "Poor", "Very Poor"];
var data = [];

/////making each review row/////
for(var i = 0; i < scoreItems.length; i++) {
	var row = require('/reviewRow').createReviewRows({
		rowdata : scoreItems[i],
		index : i,
	});
	data.push(row);
};
tableView.setData(data);

tableView.addEventListener('click', function(e) {
	for(var j = 0; j < tableView.data[0].rows.length; j++) {
		var ee = tableView.data[0].rows[j];
		if (j == e.index) {
			e.row.rowView.backgroundColor = "#D30A32";
			for(var k = 0; k < e.row.rowIconData.length; k++) {
				e.row.rowIconData[k].image = "/blueStar.png";
			};
		} else {
			ee.rowView.backgroundColor = "#e3e4e4";
			for(var l = 0; l < ee.rowIconData.length; l++) {
				ee.rowIconData[l].image = "/greyStarBorder.png";
			};
		}
	};

});

win.open();
Then make a "reviewRow,js" file in your Resources directory and write the following code in it -
 exports.createReviewRows = function(params) {
	params = params || {};

	var row = Ti.UI.createTableViewRow({
		height : 44,
		backgroundColor : "transparent",
		className : "scoreRows",
	});

	if (Ti.Platform.osname === 'android') {
		row.selectionStyle = Ti.UI.iPhone.TableViewCellSelectionStyle.NONE;
	} else {
		row.backgroundSelectedColor = "transparent";
	}

	var rowView = Ti.UI.createView({
		height : 34,
		top : 10,
		backgroundColor : "#e3e4e4",
	});
	row.add(rowView);
	row.rowView = rowView;

	var rowLabel = Ti.UI.createLabel({
		top : 4,
		left : 20,
		width : 150,
		text : params.rowdata,
		color : "#000",
		font : {
			fontFamily : 'Arial',
			fontSize : '17sp',
			fontWeight : "bold"
		},
	});
	rowView.add(rowLabel);

	var rowIconView = Ti.UI.createView({
		right : 20,
		width : 120,
		layout : "horizontal",
	});
	rowView.add(rowIconView);

	var starCount = 5 - params.index;
	var spaceCount = 5 - starCount;
	var rowIconData = [];

	for ( i = 0; i < spaceCount; i++) {
		spaceView = Ti.UI.createView({
			width : 22,
			left : 2,
		});
		rowIconView.add(spaceView);
	}

	for ( j = 0; j < starCount; j++) {
		rowIconData[j] = Ti.UI.createImageView({
			top : 4,
			left : 2,
			height : 22,
			width : 22,
			image : "/greyStarBorder.png"
		});
	}

	for (var i = 0; i < rowIconData.length; i++) {
		rowIconView.add(rowIconData[i]);
	};

	row.rowIconData = rowIconData;

	return row;
};
This is all you need to do. Hope this blog is useful to you.


Cookies are important to the proper functioning of a site. To improve your experience, we use cookies to remember log-in details and provide secure log-in, collect statistics to optimize site functionality, and deliver content tailored to your interests. Click Agree and Proceed to accept cookies and go directly to the site or click on View Cookie Settings to see detailed descriptions of the types of cookies and choose whether to accept certain cookies while on the site.


About Author
Akshay Luthra
Akshay Luthra has excellent experience in developing Cross Platform Mobile Apps using JavaScript and Titanium Framework. He loves listening to music and travelling new places.